For some, yoga can look like an insane challenge even when it comes to the simplest poses. But for those that are well versed in the language of yoga, you may be looking to step up your game and try out something new and more challenging.
We will look at the most challenging yoga poses that you won’t often see in standard yoga routines. For these to be successful they require you to be strong, flexible, and balanced. Those of you suffering from head, neck, back, and shoulder injuries. They should also not be attempted by anyone who is pregnant. Make sure to practice these with a qualified instructor before trying them on your own.
Here are 10 of the most difficult yoga poses on earth!
1. Head To Foot Pose – Sirsa Padasana
Starting off with an incredibly difficult backbend, the head to foot pose requires strength of body and mind. Sirsa means head and Pada means feet, ergo Sirsa Padasana. This practice involves placing your feet on your head. This is an inversion pose of the Salamba Sirasana, it involves a deep backbend. In order to pull this off, you must have an incredible body and breath awareness as well as a flexible spine and strong shoulders, arms, neck, and core muscles. This will ensure that you can fall gently back with your hips and place your feet on your head.
You will find that this pose impacts the body similar to that of Vrschikasana (Scorpion Pose). However, with this, you will feel more pressure on the back, neck, and head. This pose is great to act as preparation for moving onto more complex poses such as Poorna Salabhasana (Full Locust Pose).
To get into this pose you must first enter Sirsasana (Headstand Pose). From there, whilst exhaling slowly you must bend your legs bringing your feet back towards your head. The bending action must be deep and slow in order to progress the stretch gradually from your naval down to your toes. Next, exhale slowly and start to bend the hips. You must lengthen your thighs as well as extend your knees. This will help to bring your feet as close to your head as possible. Make sure to allow your yoga instructor to guide you through this pose gradually before adding it to your at-home routine.
2. Formidable Face – Gandha Bherundasana
This is the ultimate pretzel pose that looks not too different from something you’d find a contortionist attempting! It is also a variation of Sirsa Padasana. This pose involves moving from Sirsasana (Headstand Pose) and slowly bending the legs and feet towards your head until they are stretched out and your feet are placed on the floor. Your feet will end up placed on either side of your head. As you inhale and exhale, you will feel the intense stretch and relaxation effects of this pose.
In Sanskrit, ganda means face or cheeks and bherunda means something similar to powerful, extreme, or intense. The name of this pose actually refers to a bird from Hindu mythology. This bird had two heads/faces and was believed to have held a magical strength. This pose is inspired by this myth and therefore represents the strength and power the bird held.
Of course, this is an advanced pose. It helps to boost your energy flow and is great to include in yoga sequences for boosting energy. Ganda Bherundasana uses intense body strength relying on the shoulders, lower and upper back as well as the core muscles. Each of these areas of the body will benefit from the stretching and strengthening that comes with practicing this pose. It is also said that this pose can help to keep the muscles around the neck and face healthy, including reducing the appearance of wrinkles and a double chin.
3. Scorpion Handstand Pose – Vrschikasana B
Vrschikasana B is an advanced balancing inversion yoga pose. It is a combination of Adho Mukha Vrksasana (Handstand Pose) and Vrschikasana (Scorpion Pose). To start this pose you must enter handstand pose. Then, reach your legs backward as your spine curves and your feet drop down to the back of your head. Keep your eyes on the ground so as to make sure that the neck is also arching.
This pose is named scorpion handstand due to the fact that the lower body looks like a scorpion’s tail. In Sanskrit vrschika translates to scorpion and asana translates to pose. Vrschikasana improves physical balance as well as promotes mental and spiritual balance. There are other benefits to performing this pose, including strengthening your wrists, shoulders, arms, and core muscles. As well as stretching the spine and front of the body. It also helps to boost circulation and improves respiration due to the way it opens up the chest.
This pose shows great strength and flexibility. There are other variations available for this pose, as well as modifications for those wanting to ease into the pose. Make sure to practice this pose with an experienced and licensed yoga instructor before adding it to your own yoga sequences.
4. Destroyer Of The Universe Pose – Kala Bhairavasana
This advanced posture uses Vasisthasana Starfish (Side Plank Starfish) as its base pose. In Sanskrit Kala Bhairavasana translates to Pose Dedicated to Shiva the Destroyer. Kala Bhairava means Shiva in His Most Formidable Form. As the name suggests, it is dedicated to Lord Shiva who is thought to be the destroyer of worlds.
Starting from a side plank position with one of your hands on the ground and your body turned to the side, the leg that is closest to the ground is bent and raised up so that your foot is resting behind your head. The arm furthest from the ground is then lifted straight into the air and the leg that is behind your head is raised up further, deepening the stretch. This pose is as challenging as it looks and requires an incredible amount of mobility, especially around the hips. It also requires great core strength to make sure that there is balance and control within the posture.
There are several benefits to performing this pose. It is fantastic at improving balance as well as strengthening your core and opening the hips. Not only this but it helps to enhance mental focus and strength. Some instructors consider this pose to be very beneficial because of the challenge it provides as well as the opportunities for exploring the extremes of flexibility. If you are a beginner it is best not to attempt this pose until you have become more advanced and comfortable with yoga. There are more accessible variations of this pose including Vasisthasana (Side Plank Pose).
5. Yogic Sleep Pose or Sleeping Turtle – Yoganidrasana
This pose involves an extremely deep forward bend where your limbs wrap around your torso tightly. This is another contortion-esque pose that makes those that tackle it look like a pretzel.
In Sanskrit, Yoga translates to unite, Nidra means sleep and Asana means posture, or pose.
This pose may look very intense at first glance, however, if you have someone help and assist you with entering the pose carefully, then you will find that it is a very relaxing experience. This position is said to stimulate pratyahara, the state of deep and peaceful relaxation that comes with releasing the senses.
Experiencing pratyahara is said to be extremely beneficial. You draw in your awareness like someone retreating inward, you breathe slowly and your muscles enter a relaxed state. After this, it will feel like everything is simply letting go. Your senses also relax, allowing everything to feel distant while you gently connect with the universe.
Before practicing this pose, it is essential that you have open hips and loose hamstrings. Your body must be ready before tackling this. You can also start with other yoga poses before attempting this one such as Adho Mukha Svanasana (Downward Dog) and Balasana (Child’s Pose).
6. Ear Pressure Pose – Karnapidasana
Karnapidasana is a pose variant of Halasana (Plough Pose). This pose is an advanced pose that allows the hops to open. The difference between the two poses is that Halasana (Plough Pose) keeps the feet together. In Sanskrit, Karna means ear and Pida means Pressure. From the name you can probably guess that the ears will feel some pressure. This is because the knees are bent and placed on either side of the head exerting a little pressure on the ears so that the sounds around you are muted.
By practicing this yoga pose, you will exercise the fifth limb of yoga, Pratyahara. Just like we explored in the last pose, Pratyahara withdraws the senses from its surroundings and allows you to connect deeply to your inner self and the world within. This pose involves a forward bend which allows the mind to calm and also provides a space for you to turn your attention inwards in order to relax the body and mind.
This is indeed a very challenging pose, but when practiced correctly, it provides an opportunity for amazing relaxation. It can be extremely therapeutic as well as release tension within the deeper tissues within the neck and lower back. It is recommended that you start with poses such as Halasana or Shoulderstand Pose (Sarvangasana) before moving on to Karnapidasana.
7. Firefly Pose Variation Feet Crossed – Tittibhasana
Tittibhasana is a difficult pose that requires a lot of balance resting on the arms. It also requires strength within the core and hamstrings. This pose helps to build on balance, awareness, and strength throughout the mind and body. It is also a great energy booster, so if you’re able to pull this one off then make sure to add it to your energy-boosting yoga sequence. In Sanskrit Tittibha translates to insect or fly and Asana translates to pose or posture.
To start, you must make sure your feet are around 18-inches apart and then move into a forward bend keeping your knees bent slightly. Next, move your shoulders under your knees as far as you can, locking them into the underside of your knees. Your hands must remain flat on the ground. After this, you can begin to bend your elbows slightly and shift your weight to rest on your arms. This built-up momentum will lift your feet off of the ground. Once your feet are off the ground, bring your feet together and cross them over each other to complete the crossed feet variation of Tittibhasana.
If you need to modify this pose to be slightly easier, you can perform regular Tittibhasana (Firefly Pose) or you can lower your feet to allow for an easier stretch before you work on lengthening the stretch. You need to make sure that your elbows, wrists, shoulders, and lower back are without injury. Do not attempt this pose if they are injured. Make sure to practice this pose with a licensed yoga instructor before attempting it on your own.
8. Awakened Pose – Buddhasana
This pose is a great hip opener. Buddhasana challenges the flexibility and strength of the muscles within your legs, shoulders, hips, and lower back. In Sanskrit, Buddha translates to awakened and Asana translates to posture or pose. Before practicing Buddhasana you must warm up your quadriceps, hamstrings, shoulders, hip flexors, lower back, neck, and core muscles. Once you are in this pose you must stay aware of your breath and body in order to prevent pushing yourself too hard or overstretching the muscles.
There are many benefits to performing this pose. Physically, you will find that your shoulders, hips, back, and abdominal muscles will become stronger and more flexible. This will help to improve posture. This pose will also help you to be aware of your breathing, especially when the leg is placed behind the back, staying calm and relaxed is key to reaping the benefits of Buddhasana. It may also help improve circulation as well as lower the heart rate into a relaxed state.
If you are looking for an easier way to enter this pose then it is recommended that you attempt to open your hips by raising your leg up into the air rather than stretching it behind your back. Make sure to seek assistance from a fully qualified yoga instructor before attempting this pose.
9. One-Handed Tree Pose – Eka Hasta Vrksasana
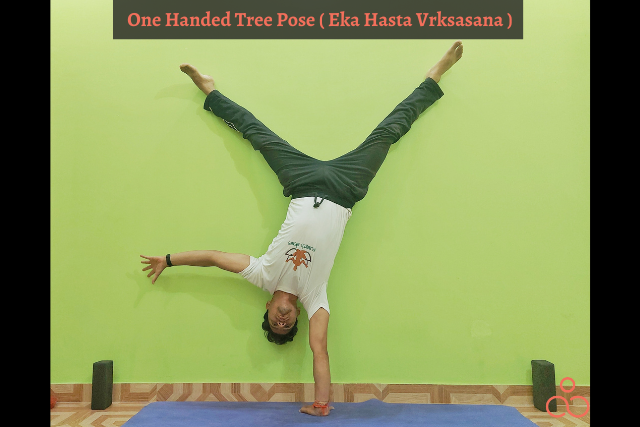
This pose is essentially a one-handed handstand except that the legs are spread far apart. Before entering this pose you would start with the regular Adho Mukha Vrksasana (Handstand Pose) followed by spreading your legs apart and lifting one hand off of the ground. Once you have finished with the pose, you can either return to Adho Mukha Vrksasana or lower your legs to the ground to return to an upright position.
In Sanskrit, Eka translates to one, Hasta translates to hand and Vrska translates to tree. This is an advanced inversion pose that allows you to develop strength in both body and mind. You will need to be familiar with inversion practice before attempting this pose. Balance is incredibly important with all inversion poses, especially this one. You must have strong muscles within your elbows, wrists, core, and shoulders. On top of this, you must relax your mind and remain calm in order to keep the correct posture as well as make sure your breathing remains fluid.
10. Corpse Pose – Shavasana
Aesthetically, this pose looks like it may be the easiest to perform. However, there is more than just physicality to this pose. It is known as one of the most difficult yoga poses due to the fact that people aren’t usually aware of how to correctly perform it. In Sanskrit, Shava translates to corpse and Asana translates to pose or posture.
This pose is great for getting rid of fatigue, especially that which is developed from practicing other poses such as the ones above. The objective of this pose is to keep the body still, like a corpse. You must remain still for a length of time and keep your mind empty of thought without falling asleep. This helps you learn how to relax correctly so that you can use that for your own practice.
This is the only pose on the list that isn’t considered an advanced pose in yoga practice. It is in fact considered a base pose. But, unless you are practicing it correctly and keeping your mind and body clear and focused, then you will not be reaping the benefits of it. It helps to bring your breath under control as well as improves your posture by allowing the body to relax and your spine to come to rest. It is believed to have beneficial effects on insomnia and anxiety.
Conclusion
This list has covered some of the most difficult yoga poses on Earth. Make sure you are careful when practicing these poses. Seek guidance from a trained yoga practitioner before you do these poses alone. If you are not yet there, then why not use this list as a bucket list for your yoga development?
