Medically parts are written by Dr. Rai
Viparita Karani is classified as a form of Kaya yoga mudra. Kaya mudras means Asanas, pranayama, and concentration are all combined.
Kaya mudra combines the entire body with breathing and concentration practice to create asana, unlike ordinary yoga hand mudras.
Viparita means “reverse” in Sanskrit, while Karani denotes “an action to complete a task.” Viparita Karani denotes the “action of reversing” when summarising the meanings of root words. The flow of energy is reversed in Viparita Karani Mudra by reversing action.
Viparita Karani mudra is comparable to other inverted yoga poses like Sarvangasana (Shoulder Stand) and Sirsasana (Headstand).
Here is an example of client Mr. Iyengar, who has been advised to practice a deep Viparita Karani as “natural dhyana.” According to Patanjali, Dhyana is the seventh of the Eight Limbs and can be translated as “meditation.”
Meaning of Viparita Karani
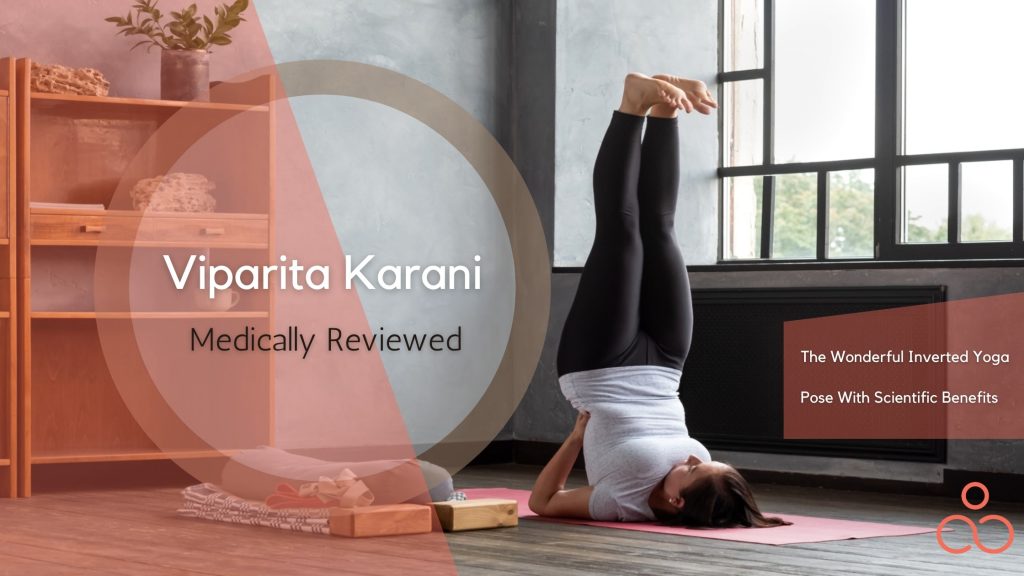
In hatha yoga, Viparita Karani, legs up the wall pose, is both an asana and a mudra (a seal done by your hands and fingers). It’s usually a completely supported pose using a wall and sometimes a pile of blankets (used to support the buttocks during the inverted position) in modern yoga as a workout.
According to Hatha yoga experts, this inverted balance exercise was created to bring inner harmony and union of opposites, such as the bloodstreams (arterial and venous), nerve impulses, through the use of gravity.
The natural erect body position is turned into a reversed position in Viparita Karani Mudra, where hands support the spine at a 60-degree angle. The ‘head down, legs up’ position allows fluids to flow back.
Mr. Iyengar said in 2005 in Estes Park, Colorado, when describing the historical significance of Viparita Karani:
“According to the Hatha Yoga Pradipika, all inversions are Viparita Karani. It includes even Sirsasana. But, according to one statement, [this] is Viparita Karani when the buttocks are somewhat down below the trunk. Viparita Karani is said to be halfway between Halasana (Plow Pose) and Sarvangasana (Shoulder Stand).”
Furthermore
This asana is a revitalizing and restorative asana that calms and energizes both the body and mind. It’s a shoulder stand inversion that’s similar to Sarvangasana (Shoulder Stand). The difference between the two Asanas is that in Sarvangasana (Shoulder Stand), you don’t use a wall. Instead, you use your hands and arms to keep and hold yourself in that inverted position.
This asana is good for calming and soothing the nervous system. The spirit of letting go is taught in this restorative position can also be applied to vigorous asana practice.
As a result, all inversions, such as Sarvangasana (Shoulder Stand), Sirsasana (Headstand), and Adho Mukha Vrksasana (Handstand), are Viparita Karani postures. When people talk about the historical benefits of the pose, they’re usually talking about all prolonged inversions (holding the inverted posture for a long time).
Viparita Karani Pose Breakdown
Because Viparita Karani Mudra is a restorative pose, many people choose to execute it with props like pillows, bolsters, and folded blankets. You can start by selecting a prop that meets your needs and then following the procedures outlined below.
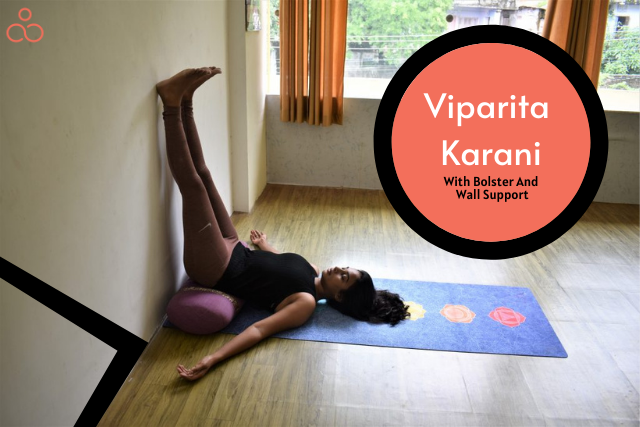
- Select an open area near the wall and sit so that your feet are flat on the ground and perfectly spread out in front of you. Make sure your left side of the body hits the wall as well.
- Exhale deeply and lie down flat on your back. Turn the soles of the feet upwards while keeping the back of the legs firmly against the wall. In order to settle down and to be comfortable in such a pose, you may need to move around a little to make minor adjustments.
- Place your buttocks slightly away from the wall or gently press them against it.
- Maintain a resting position for your head and back on the floor. Keep your body at a 90-degree angle.
- Place a prop under your hips. Should you be on a tight budget, you can use your hands to hold your hips and create a curve around your lower body.
- Maintain a neutral position for your neck and head, and relax your face and throat.
- Close your eyes and take a deep breath. For around ten minutes, stay in this position.
- After that, let go and roll to one side. As you sit up, take a few deep breaths.
A Detailed Explanation
Do not get confused yet. Here’s a detailed explanation.
STEP 1:
Determine two factors regarding your support before completing the pose: its height and its distance from the wall. By the way, make sure that the wall is clean. There shouldn’t be any spider webs or other crawling thingies.
If you’re more rigid, use lower support that’s farther away from the wall; if you’re more flexible, use a higher support that’s closer to the wall.
Your height also determines your distance from the wall. If you’re shorter, come closer to the wall, and if you’re taller, move further away. Experiment with your support’s position until you find one that works best for you.
STEP 2 :
Start around 5 to 6 inches (13 – 15 cm) away from the wall with your support. Sit on the right end of the support, with your right side against the wall (left-handed people can use “left” instead of “right” in these directions).
Exhale and throw your legs up against the wall and your shoulders and head down onto the floor in one fluid motion. And if you can’t keep your legs together, use a yoga band to support your legs.
You may slide off the support and plump-down down with your buttocks on the floor the first few times you attempt this. Don’t be disheartened.
Reduce the support’s height and/or move it further away from the wall until you’re comfortable with it, then return it to its original position.
STEP 3:
Your sitting bones don’t have to be flush against the wall; they only need to be in the area between the support and the wall.
Make sure your body arches slightly from the pubis to the tops of your shoulders. You’ve definitely slipped a little off the support if the front of your body appears flat.
Slowly bend your knees, gently press your feet against the wall, and lift your pelvic a few inches off the support. Tuck the support a bit higher up under your pelvis, and then drop your pelvis back onto the support.
STEP 4:
Soften your throat by lifting and releasing the base of your head away from the rear of your neck. Instead of pressing your chin into your sternum, elevate your sternum toward the chin.
If your cervical spine seems flat, place a tiny roll (made from a blanket, for example) beneath your neck.
Release your wrists and arms out to the sides, palms up, and open your shoulder blades away from your spine.
STEP 5:
Maintain a tight grip on your legs, just enough to keep them vertically in place.
Deeply inside your body, toward the back of the pelvis, release the heads of your thigh bones and the weight of your belly.
STEP 6:
This stance can be held for 5 to 15 minutes. When removing the support, be careful not to twist it. Instead, swivel to the side and slide off the support onto the floor.
To elevate your pelvis off the support, bend your knees and push your feet against the wall. Put the support to one side, if possible lower your pelvis to the ground, and turn to the side.
Stay on your side for a few minutes before exhaling and rising to your feet.
Follow the procedure mentioned to relax your eyes. Rub your palms together to become warm and place warm palms on your closed eyes. I am sure you will find the warmth to be very relaxing.
Preparatory Poses For Viparita Karani
- Virasana
- Uttanasana
- Setu bandha sarvangasana
- Supta baddha konasana
Modifications And Variations
Arm Variations
You can hold your arms in a variety of ways. Experiment with them to discover how they affect you. What you want today could not be the same as tomorrow.
- As in Savasana, place your arms at your sides.
- With your palms up, extend your arms straight out to your sides.
- Cactus arms (also known as Stick’ Em Up arms) have upper arms straight out from shoulders, elbows bent 90 degrees, and the backs of the forearms on the ground.
- With your arms on the ground, hold your elbows overhead.
- Place your palms on your stomach, or place one hand on your heart and the other on your stomach.
The sacroiliac joints connect your pelvis and lower spine. The sacrum (the bony structure above your tailbone and below your lower vertebrae) and the top part (ilium) of your pelvis make up these structures.
For Sacrum Joint Pain Relief
Set up for the posture by placing a yoga bolster, folded blanket, yoga block, or even a cushion under your hips to support your sacrum fully.
Rest your bottom hip on the prop as you enter the posture, with the prop parallel to the wall. Turn onto your back and lift your legs to the wall.
Relax your legs once you’ve got them up the wall, so they’re heavy in your hips. This will aid in the ‘release’ of your pelvis, allowing for a small amount of space on either side of your sacrum.
For Tight Hamstrings
Resting your legs against the wall can be challenging. Move your hips away from the wall to make the pose more accessible. The stretch to your hamstrings is reduced as a result of the decrease in hip flexion.
If you have a yoga strap, make a huge loop with it and wrap it around your legs. This will allow you to stretch your legs and press into the strap for support.
Can’t Keep Legs Straight For More Than 5 Mins?
Take a chair and place it against the wall, with the back of the chair touching the wall. Instead of leaning against the wall, rest the backs of your legs on the chair’s seat, with your hips extended to around 90 degrees.
For More Relaxation
You can relax more deeply without your legs slipping apart if you use a yoga strap across your thighs. Wrap the strap over your thighs or around your calf muscles, right above your knees. Try both and discover which one allows you to relax the most.
Do one of the following to get into the strap pose:
- Before swinging your legs up the wall, wrap the strap over your legs.
- Hook the strap over one leg, then put the other leg through the loop after you’ve brought your legs up the wall.
For Pregnant Women
To make a V-shape with your legs, wrap a yoga strap around your ankles. This may necessitate tying two straps together. This wide-leg version gives you extra room to unwind.
You don’t have to be pregnant to accomplish this variation, of course. It’s a great one for all ages!
For Unsteady Legs
Place your feet on the wall and bend your knees. Gently push your upper body away from the wall with your feet until you can lower your pelvis to the ground and rest your feet flat on the wall.
While practicing Viparita Karani, this version might also assist in reducing leg tingling.
Different Legs Versions You Can Try
You can undertake various leg variations, such as bringing your feet together in Baddha Konasana (Cobbler’s Pose). As in Prasarita Padottanasana (Wide Stance Forward Bend) or Upavista Konasana (sitting upright with the legs as wide apart as possible, spread your legs wide).
Experiment with different leg variations to see what works best for you.
Precautions Before Performing Viparita Karani
- Make sure your bowels are empty before beginning Viparita Karani.
- If you have already eaten, maintain a 6-hour interval between your practice and your food if you are doing Viparita Karani for an extended period.
- This inversion pose should be avoided when you have high blood pressure, heart illness, or thyroid difficulties.
- Always exit the stance slowly.
Props For Modifications
A strap and a small sandbag are two typical props for Viparita Karani, in addition to a pillow or blanket for assistance.
You can tighten the strap around your thighs, slightly above the knees, after you’re in the pose. The belt will keep your legs in position, enabling you to relax your legs.
It’s a little more challenging to get the sandbag in place. Bend your knees and glide your feet down the wall, keeping your ankles extended and your soles perpendicular to the ceiling until you’re in the pose.
Lay the bag across your soles (or heels) as best you can, then straighten your knees and deliberately push the bag toward the ceiling. The weight on the legs helps to relieve lower back stress.
Taking A Partner’s Help
A companion can also assist you in grounding the thigh bones’ heads into the wall. As you complete the posture, have her/him stand next to you.
She/he should next lean forward and wrap her/his arms around your front thighs, right above the pelvic joint.
She/he should bring the thighs closer to the wall on your inhale and hold them firmly against the wall as you release the front torso away from the thighs on your exhale.
Rep for a few more breaths.
Best Time To Practice
Viparita Karani, like other inverted yoga postures, is best practiced first thing in the morning after bowel movements and a shower.
The body’s metabolic and other functions are already at their height throughout the day. In this situation, reversing the body’s natural flow will have more negative consequences than benefits.
However, after 3 hours of a decent lunch, it is possible to do it in the afternoon. It should also begin after a 10-minute break in Shavasana.
Tips For Beginners
As a beginner, you may find it difficult to achieve proper alignment in this pose. You must breathe in such a way that the heads of your thigh bones are firmly pressed against the wall for this to work.
It will aid in the release of your spine and stomach. Imagine the inhale passing through your torso and forcing the thigh bones’ heads against the wall.
Allow your thigh bones to press harder against the wall and your body to draw away from the wall as you exhale each time.
This position might serve as a useful substitute for Savasana, particularly for newbies who have trouble relaxing.
It’s also a fantastic replacement for anyone, regardless of where they are on their yoga path. Legs Up the Wall Pose has many of the same advantages as Savasana, plus a few more.
Benefits of Viparita Karani
Viparita Karani is thought to be beneficial for almost anything that ails you, according to modern teachers, including:
Physical Benefits
- This position softly stretches our hamstrings and opens up space in our low back. Elevating our legs may improve circulation and allow any excess fluid to escape.
- This posture may be very beneficial for people who suffer from edema or sciatica. Furthermore, after a long day at work, this pose can feel fantastic because it eliminates achiness in your feet, legs, and low back, making it a powerful pose.
- This pose may increase the release of digestive fluids, which helps indigestion. An increase in appetite is also possible.
- In obese people, increased metabolism in body cells can reduce fat around the waist.
- When the head is turned upside down, cellular fluid that has accumulated in lower body parts enters the circulation.
- It may protect from atherosclerosis by restoring vascular tone and flexibility (a condition of fats, cholesterol, and other substances accumulation in artery walls).
- It can aid in the relief of a minor backache.
- Stretches the back of the neck, legs, front chest, and pelvis gently.
- According to a study, inversion postures such as Viparita Karani strengthen the heart muscle, improving circulation and a lower risk of heart disease.
- Viparita Karani is a good treatment for cerebral insufficiency and senile dementia because it can enhance blood flow to the brain.
- On the other hand, modern professors claim that Viparita Karani can help with premenstrual syndrome, menopause, menstrual pains, and sleeplessness.
- The thyroid gland is stimulated by the pressure applied around the throat muscles and chin in this mudra. It may bring the functions of a hypoactive thyroid back into equilibrium.
All In All
We automatically begin activating the vagus nerve, commonly known as the ‘wandering nerve’ due to its path from the brain to the gut, by reclining in an inverted position and letting the respiration too slow.
When in an inverted pose the nervous system as a whole receives the message that it is secure to relax, and we are finally able to change from the fight or flight system, which is partially responsible for stress-related illnesses.
Moreover
Viparita Karani’s key physical benefits:
- Allows you to relax your muscles.
- It can aid in the relaxation of the neurological system, which may aid in the relief of anxiety.
- It may make you feel less tired.
- Many people find that being in this position allows them to relax profoundly, releasing tension and stress.
- This is a fantastic passive pose for lengthening your hamstrings.
- Relieves fatigued legs and feet (after a marathon, flight, long walk/hike, bike ride, or other strenuous activity).
- Stretches glutes, hamstrings, and hip adductors if legs are apart.
- The sciatic nerve is supported by the wall, which allows your legs to relax. This makes Viparita Karani a useful practice to do if your legs are fatigued, and it also helps relieve sciatica pressure.
Mental Benefits of Viparita Karani
This posture’s mental benefits are what make it so amazing. In comparison, it is a simple position, but it is quite beneficial to our mind and body. Because this pose stretches our hamstrings and stimulates our sciatic nerve, it is thought to stimulate the muscles and provide a therapeutic feeling.
Similarly, we may slow our heart rate and relax our central nervous system by moving into this pose and including deep, steady breathing. This is the ideal posture to adopt when we are feeling pressured or overworked. Practicing this posture immediately before bedtime will also help you sleep better because it allows our bodies to relax and unwind.
When To Not Perform This Asana
The following are some of the adverse effects and precautions associated with practicing Viparita Karani:
- High blood pressure: Folks with high blood pressure should avoid this yoga pose because it aggravates their condition.
- Heart disease: Practicing Legs-up-the-Wall pose should be avoided if you have a heart ailment.
- Thyroid issues: It should also be avoided by those who have an enlarged thyroid.
- It is best to stay away from it during menstruation unless performed in the presence of an experienced yoga teacher (there are many contradictory theories surrounding the practice of this pose during menstruation).
- Eye difficulties: It should not be done if someone has major eye problems, such as glaucoma.
- If you have a neck injury, you should avoid it.
- Back Issues: Only do it in the presence of an experienced yoga teacher if you have back problems.
The Science of Viparita Karani Mudra
Viparita Karani Mudra is an energizing inversion that relieves the spine, legs, feet, and nervous system.
The asana aids in achieving a state of complete relaxation. The benefit of this asana is that it may be performed regularly by any yoga student, regardless of their overall level of yogic expertise. Viparita Karani Mudra also aids in the relaxation of the mind and brain, allowing for better self-awareness.
Viparita Karani Mudra is usually done right before Shavasana since it has a powerful relaxing impact on the psyche. You can, however, practice Viparita Karani Mudra without making it a part of your normal yoga regimen.
Wrapping Up
Asana practice can be difficult. But when we put in the effort to master the postures and finally manage to keep our balance and position ourselves correctly, we usually feel a sense of success.
Spending time in any inversion is thought to help you achieve a meditative state.
Even if the rest of the world considers sitting still to be a waste of time, we know that being quiet and sitting with our thoughts is a wonderful method to calm our brains and broaden our life’s possibilities.
Your meditation practice doesn’t need to resemble that of others. So the next time you need to disconnect from the outside world, lie down with your legs up the wall and chant OM repeatedly, feel the power of breath.
