Did you know that the hip is the biggest ball-and-socket joint in your body? And because of this, it can resist considerable wear and tear without causing you to feel anything. But occasionally, the damage is too severe, and your hip starts to hurt. Bones, cartilage, muscles, tendons, or any combination of these structures may be harmed. Yoga for hip pain could be the best and safest solution according to experts, and you could also possibly try it out to get some relief!
Yoga Poses for Hip Pain
Due to the sedentary lifestyle that the majority of people lead as a result of their occupations, lower back and hip discomfort are extremely prevalent today. Additionally, since work from home has taken hold, people have lost their energy and frequently neglect to maintain appropriate posture. A majority of people work when seated or lying down on their bellies, which places a great deal of tension and pressure on the hip muscles.
Yoga is a time-tested, healthy, and efficient approach to stretching and unwinding your muscles, which may assist with many different types of bodily discomfort, including hip pain. Check out the poses listed below to help you relax and get relief from hip pain.
- Butterfly Pose, or Baddha Konasana: Sit upright on the ground. Fold your legs into your body so that the soles of both feet are in contact with one another as you exhale. Kneel with your legs out to the sides. Holding your foot’s thumb, make sure the soles are always pushed to the ground and remain in contact with one another. Once you feel at ease in the position, make sure the shoulder blades are firmly pushed to the back and that the torso is extended through the top of the sternum. Now exhale and inhale normally. Hold for one minute, then rest for 30 seconds before repeating five times.
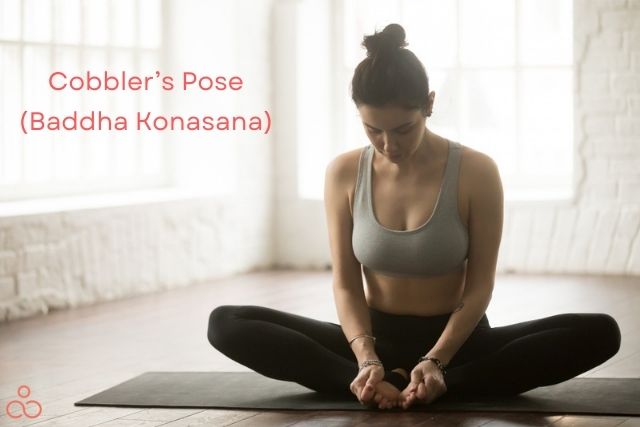
This pose is excellent for clearing obstacles in the body, particularly those in the hips, allowing for a complete range of motion and enabling a passageway for the free flow of different bodily fluids. Regular practice is incredibly effective for easing back and hip discomfort and is also great for boosting a woman’s reproductive system.
- Sitting Half Spinal Twist, or Ardha Matsyendrasana: Straighten your legs out and place your feet together while sitting. Put your right foot’s heel next to your left hip by bending your right leg. Pass the left leg slowly over the right knee. Put your left hand behind you and your right hand on your left foot. Turn your neck, shoulders, and waist to the left while glancing over your left shoulder. Maintain this position and focus on your breath with a slow inhale and exhale. Gradually, revert to your starting location, then proceed the opposite way.
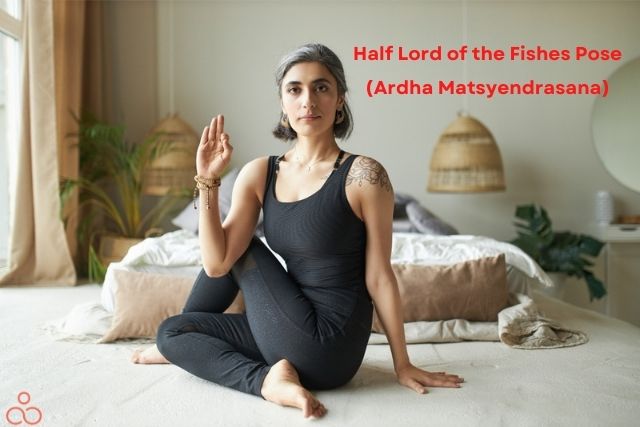
Twisting the uppermost side of the body helps to detoxify the entire body and works on the spine as a whole. This pose energizes the spinal column while stretching the shoulder, hips, and neck and massaging the internal organs. It is very helpful for backache, sciatica, weariness, and menstruation discomfort.
- Happy Baby Pose or Ananda Balasana: Lay your back flat. Bring your knees up to your chest while raising both of your legs. Now grasp the foot with both thumb fingers. Stretch your arms and legs slowly upwards at this point. Ensure that your chin is contacting your chest and that your pelvic bone is being stretched. Pulling back with your arms, press your heels up and your sacrum and tailbone to the floor. Try to maintain the stance for as long as you can while breathing regularly. Repeat five times, then return to Shavasana.
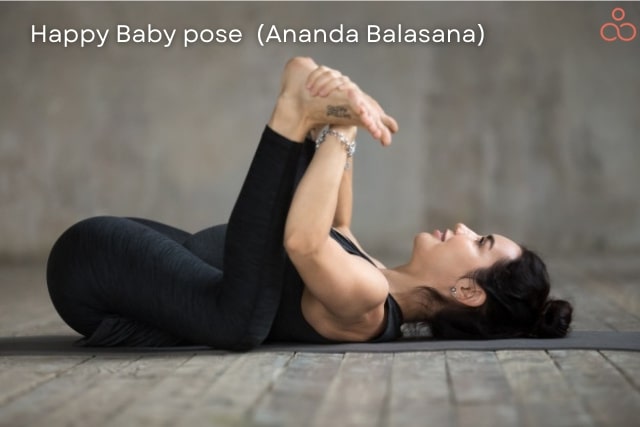
The hip joint and muscles, as well as the entire body, are stretched out significantly by the Happy Baby Pose. Not only does it improve balance and endurance generally, but it also improves blood flow and tones the muscles surrounding the hip. Hip discomfort is quickly relieved by frequent practice. Additionally crucial is its innate capacity to reduce tension and soothe the mind.
- Cow Face Pose or Gomukhasana: Stretch your legs out in front of you while you sit upright on the ground. Now slowly wrap your left leg over your right thigh while placing your right leg under your left buttock. Make sure that both knees are positioned on top of one another. Place your right arm in a bent position over your shoulder, then bend your left arm upward from behind your back until both hands are close enough to touch. Maintain a straight posture while supporting your back with your arms. Now exhale and inhale normally. Hold for one minute, then rest for 30 seconds before repeating five times.
The tension put on the muscle-tendon joints during the Cow Pose is increased when your legs are piled atop one another. The spinal cord sends messages to the muscles to release this tension. The cow posture aids in the release of endorphins, which promote a state of relaxation in your body and mind and ease hip discomfort. It is quite helpful for treating hip pain, pelvic discomfort, and strain in your thighs and legs.
- Legs-Up-The Wall Pose or Viparita Karani: Sit at first approximately 3 inches from a blank wall. Lay on your back and raise your legs so that the back of your thigh rests on the wall. Your entire back, including the spinal column, should be supported by the floor below. Your arms should rest at your sides, and your stomach should be at ease. Hold the posture for 10 minutes, or as long as you can, and then gently raise your leg to the beginning position.
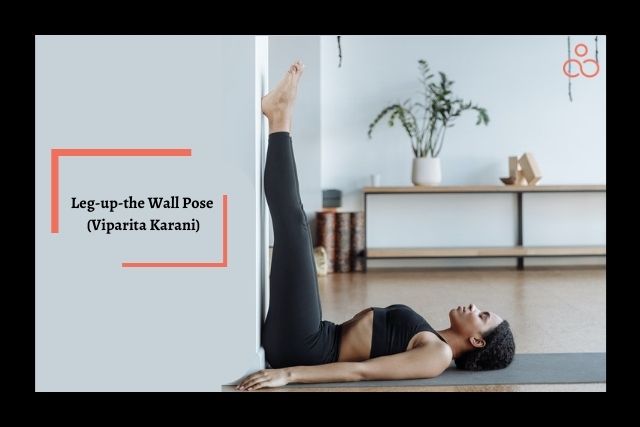
This position allows you to rest flat on the ground with your legs up without having to twist much, making it one of the more soothing postures. However, the Viparita Karini is one such advantageous yoga pose that promotes lymphatic drainage, balances blood circulation, and relieves back and hip pain. Regular use of this pose helps to loosen tight hip muscles and relieves discomfort in the pelvis and hip region.
- Progressive Low Lunge or Anjaneyasana: Step your right foot forward between your hands to begin. Slide your left foot back while bringing your left knee to the floor until you feel a stretch in your left hip. Make sure your ankle is precisely above the front knee. Hold up both arms. Take a deep breath, then lean back, elevating your hips and ribcage. Once again, lunge as normal while holding your breath and exhaling five times.
This stretch is essential for those who spend their days at their workstations. Since it engages the biggest hip muscles, this stretch is also the ideal place to begin all other hip stretches.
- Warrior pose II or Virabhadrasana II: Stand straight with your feet shoulder width apart. Turn your left foot and right foot to about 15 and 90 degrees outward respectively. With your palms up, raise both arms sideways to shoulder height, and hold them parallel to the floor. As you exhale, flex your right knee. You should look to your right. Put slight downward pressure on your pelvis. Keep breathing as you slide down. Take a breath and stand up. Bring your hands down from the sides while exhaling. 5. Repetition.

This position tones the muscles in the lower back and thighs. It is advantageous for strengthening the lower limb muscles and for enhancing overall body balance.
- Reclined Eagle Pose: Wrap the right leg over the left, the left over the right, then the right over the left as your supine. Exhale while you extend your arms and legs as far as you can. As you exhale, bend your body such that the tailbone and shoulder blades rise off the floor. Repeated inhalation will cause the arms, legs, and arms to grow longer and move further apart from one another.
It will maintain your abs nice and flat while relieving your hip and joint ache.
Does Yoga Assist With Hip Pain?
Yoga may reduce hip discomfort, but understanding some basic hip anatomy will help you better grasp how. The hip joint is a ball-and-socket joint, with the thigh bone acting as the “ball” and the trochanter, the top of your femur bone, as the three bones that make up the “socket” component (the ilium, the ischium, and the pubis).
The head of the femur and the inside of the acetabulum are lined with smooth white cartilage (the cup that receives the femur). Synovial fluid, which is produced in the joint lining, lubricates and cushions joint movement.
This facilitates painless bone movement. In addition to the bones, muscles, tendons, and ligaments all work together to support the joint and keep it from dislocating. Yoga for hip pain helps to stretch and lengthen tendons and ligaments while gently strengthening and stabilizing the entire hip joint to promote a hip range of motion. For both newcomers and more seasoned practitioners, it is low-impact and simple to alter. Yoga also helps to balance the body and mind by reducing the tension associated with a pain condition.
How Yoga Can Help You Feel Better?
Yoga may be used to treat a variety of hip pain-related issues as it offers a wide spectrum of benefits for the body both physically and mentally.
First and foremost is that yoga’s muscle and joint stretches not only make your hip more flexible but also help you gain strength and correct misaligned posture.
Second, relaxing stiff hip muscles is the main goal of gentle yoga postures. This will help the wounded cells’ ability to regenerate new ones.
Thirdly, twists and standing postures in yoga can significantly improve blood flow to your hip area. This will be especially helpful in rare instances of osteonecrosis, in which blood flow obstructions cause bone cells to die. The neurological processes in your body benefit greatly from restorative yoga stretches. Your discomfort will be reduced and your ability to regulate your muscles will improve with effective stimulation of your CNS and peripheral nervous system.
Last but not least, yoga has demonstrated anti-inflammatory properties that will particularly treat the sources of inflammation.
Possible Causes of Hip Pain
Simply carrying a large bag on one side, standing or sitting for extended periods, or engaging in any physical activity improperly can cause tight hips. All of those causes might stiffen the hip muscles, which can result in a variety of various hip pain symptoms. Sometimes bad posture and lower back discomfort are also related to tight hips. The easy yoga routine below can help relieve hip discomfort whether you simply have stiffness or pinching sensations, or something more serious (like tendonitis or arthritis)!
Yoga Equipment That Can Reduce Hip Pain
Yoga for your hips may be done without expensive equipment. However, you may utilize a few supports to lessen or perhaps get rid of hip discomfort. Check out these items you may purchase to aid with hip pain relief:
Massage gun
Muscle knots are frequently the outcome of prolonged exertion. Using a massage gun might help you relieve hip discomfort. A massager improves muscular aches and weariness brought on by strenuous exercise or general hip discomfort.
Foam Roller
A foam roller can help you recover from your workout by easing discomfort and encouraging muscle restoration. It is excellent for placement, balance, and spinal stabilization during strengthening exercises.
Pillow
After a strenuous and exhausting day, relax your hips as you sleep. Hip alignment is encouraged, and hip stiffness could be reduced. Hip discomfort may be alleviated if utilized underneath the hips.
FAQs
Can yoga relieve hip pain?
Numerous advantages of yoga may be used to treat a variety of hip pain issues. Yoga’s muscle and joint stretches not only make your hip more flexible but also help you gain strength and correct misaligned posture. Relaxing stiff hip muscles is the main goal of gentle yoga postures.
What hip stretches work best to relieve pain?
Stretching your hip muscles gently and appropriately will happen perfectly in the Warrior-1 pose. The muscles and tendons in this position are stretched just enough to start the healing process. Additionally, this position will improve your hip region’s strength and control. Stand tall and spread your legs widely. Keep a distance of, say, 3 to 4 feet. Check out all the other best poses recommended for hip pain in the above sections.
Conclusion
Hip tightness can induce discomfort in other places of the body because of how interrelated our bodies are (lower back or knee pain anyone?) This discomfort can cause pain in the groin, thigh muscles, and the inside or outside of the thighs if it is not addressed. You have the power to help free your locked-up hips since yoga enables us to take our physical care more into our own hands. So, if you’re experiencing discomfort, attempt these workouts.
