Have you ever witnessed inversion poses in yoga classes or ads for fitness? I always found it amusing and very interesting to try by myself. However, it is not simple! You need to break many physical and mental barriers to achieve that. The flying pigeon pose is yet another counterbalance pose that works against gravity, and you must be ready to fall right on your face a couple of times before you master it. Here we are, with a detailed guide on the best preparatory poses and a sequence of steps to set you on a full flight. So, dive in!
What is Flying Pigeon Pose?
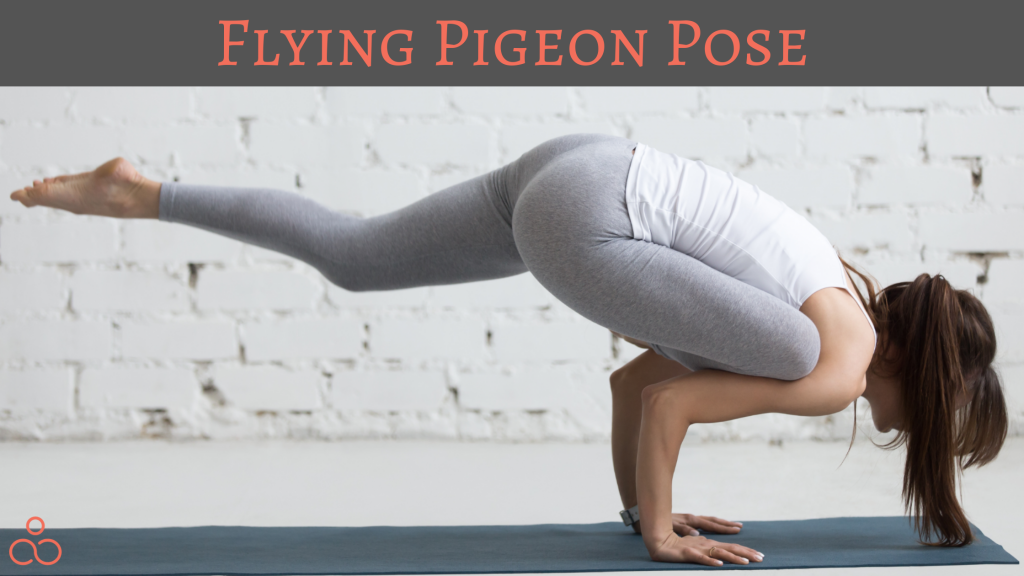
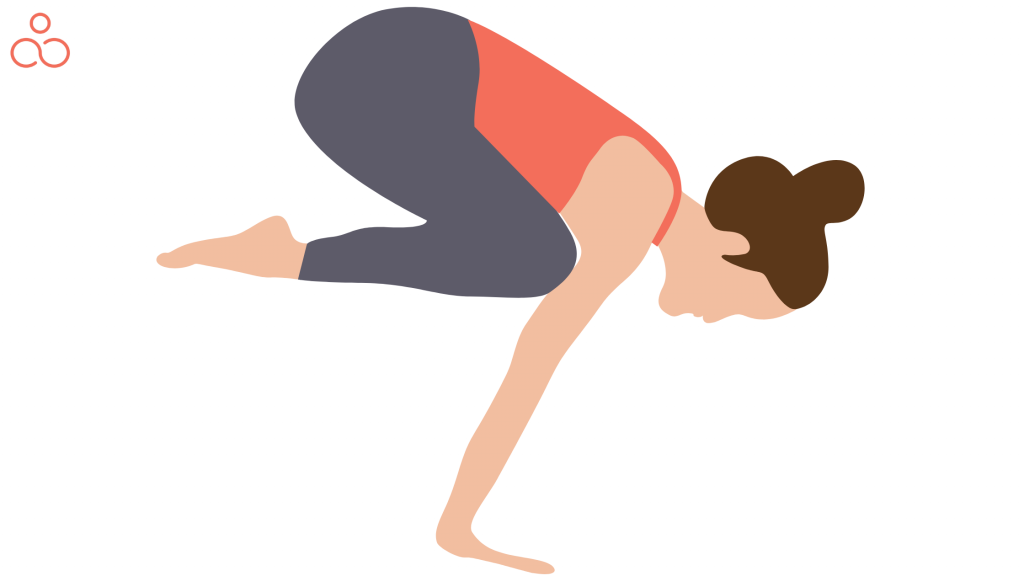
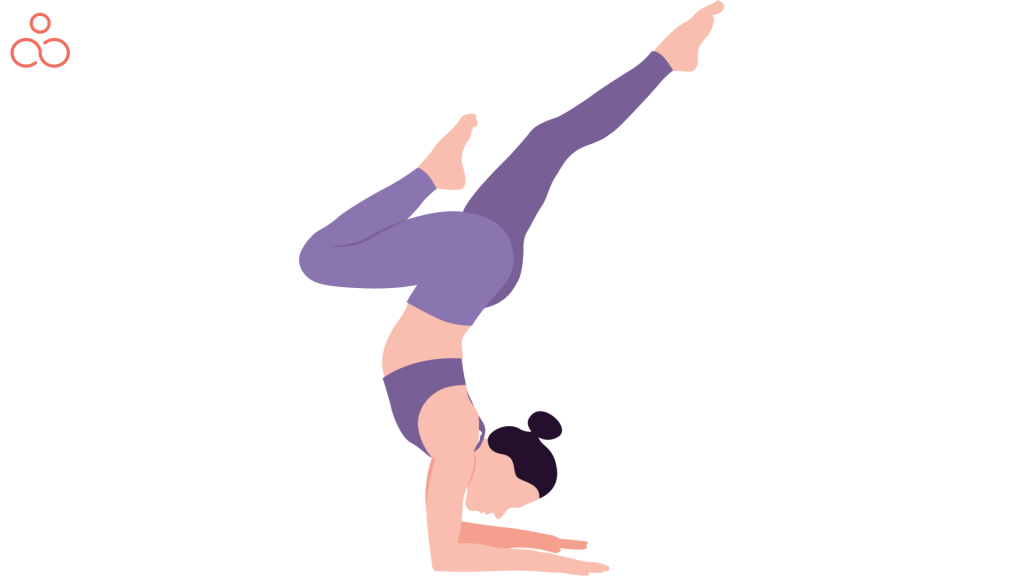
Flying Pigeon Pose, also known as Eka Pada Galavasana, is an arm-supporting, hip-opening, and core-strengthening pose. This posture is difficult to master because it has many distinct and challenging aspects. The posture becomes much more achievable if you strip it down to the tiniest, minute achievable steps. It is an advanced level balancing posture where you balance the body weight on your hands. You must have good core strength and flexibility to hold the legs in the pose.
Anatomy of the Pose
Flying Pigeon Pose is beneficial to the following muscle tissues and can thus be incorporated in yoga sequences that focus on those muscles:
- Shoulders and Arms
- Biceps and Triceps
- The fundamentals (Abs)
- Hips-External
Benefits of Flying Pigeon Pose

Eka Pada Galavasana (Flying Pigeon Pose) is an advanced yoga pose that is suitable for people who are looking for challenging arm balances. However, if you are comfortable with arm balances, this can also be incorporated into your intermediate-level workouts. Regardless of the nature of the practice, there are several advantages to be gained, which are described below:
- Strengthening and lengthening the body: Eka Pada Galavasana is a strenuous arm balance exercise that needs the abdominal and core muscles to elevate and balance the body on the folded leg and arms. It emphasizes the arms and shoulders while steadily improving their strength. The pelvic floor muscles, gluteus maximus, hip flexors, biceps and triceps, and hips are all used to keep the entire body balanced. It aids in lengthening the legs and neck, which would be necessary for most advanced postures.
- Opens the Hips, Arms, and Shoulders: The knees in Eka Pada Galavasana are in such a posture that they assist in expanding the hips and improving the strength and flexibility in the joint. Difficulty in doing this pose might also indicate asymmetry between two hip flexors, with one being more flexible or powerful than the other. In addition to opening the hips, this pose helps strengthen and stretch the arms while opening the shoulders.
- Awareness and Balance: Most students should be able to effortlessly transition into arm-balance poses because of their physical strength and flexibility. However, the capacity to stay in the position is necessary to get the most out of any practice. To maintain stability in a posture, you must have the proper control to calm the mind (known as Chitta vritti nirodha). One leg must be in the air while the other rests on the arms in Eka Pada Galavasana (Flying Pigeon Pose), putting one’s mental skills to the test.
- Tones core muscles – There is sufficient flexing and stretching in the core muscles, which helps tone. While the impact on core muscles is not visible, it is very prominent. In fact, one needs to have excellent core strength to engage in this pose.
- Stimulates digestion – The abdominal muscles are worked on while engaging in this pose. Hence, this pose stimulates digestion and improves abdominal health.
- Improves balance and Develops confidence – The flying pigeon pose is a challenging pose that tests your capabilities both physically and mentally. Would you be interested in trying a pose if I say that you might end up falling on your face to the ground? Not! Before you even try this pose, you will be stuck with a mental block that might end up hurt. So, if you can achieve this pose, you are in a much better state of self-confidence and physical balance.
Risks of Flying Pigeon Pose
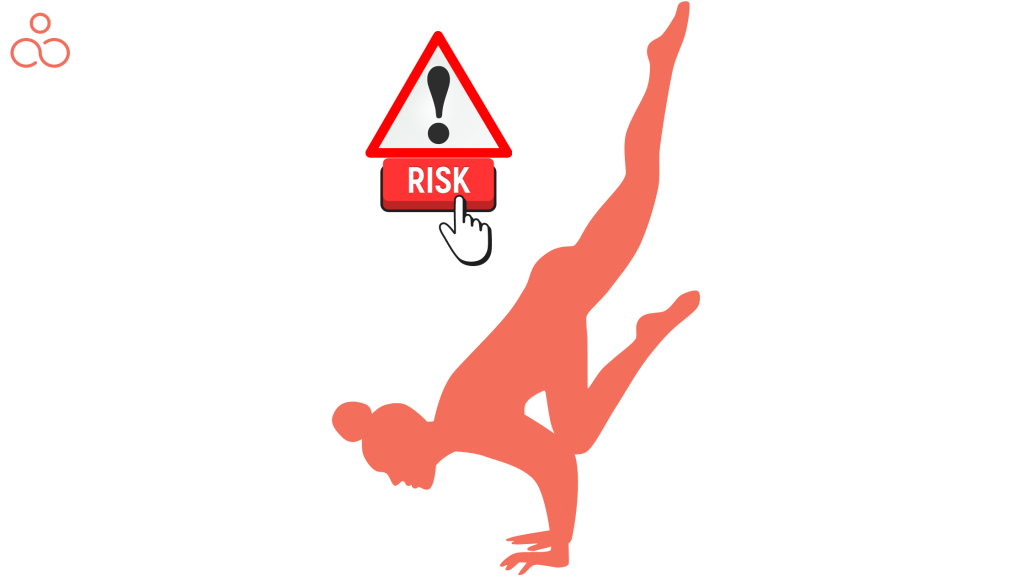
Flying Pigeon Pose is relatively safe, but pushing above your body’s potential may multiply the chance of injuries.
When you have chronic pain in your hips, knees, or back, skip Pigeon Pose until a healthcare professional recommends it. Pregnant women are also recommended to avoid this pose as it might be fatal to the mother and the baby.
People with mild-to-moderate muscle strains should seek medical advice first. Moreover, there’s serious concern that Pigeon Posture could lead the abdominal tendons, which link the inner hip bones, to overswing. It may degrade the tendons over time and result in additional hip-related disorders. Therefore, we recommend you do it under the supervision of an expert teacher.
Many people also find it challenging to raise their legs aligned in front of their mat. Instead, they tuck their shins excessively tight to their bodies. Excessive joint stress can cause knee injury over time. To avoid these dangers, tuck a folded towel beneath your right hip and thigh to modify the posture of your hips and knees. As a response, the strain and risk for injury will be lessened. You may also practice with a certified yoga instructor who can offer advice and modifications on the posture. Finally, if Pigeon Pose causes you any pain or discomfort, it’s best to avoid it.
The Science behind Eka pada galavasana!
The Flying Pigeon Pose necessitates a balance of strength and flexibility. Your hips, shoulders, and back should all be flexible. It’s also a great hip opener, increasing hip flexibility and range of motion. This pose can be achieved seamlessly when your body weight is distributed equally on your arms, and the leg is extended high above. However this can be explained easily in just a few words, but it is challenging to push yourself to reach that balance by breaking all your mental and physical barriers.
10 Preparatory Poses for Flying Pigeon Pose
Since this is a complex pose achieved only with the perfect balance of strength and flexibility, we have come up with a list of preparatory poses that might help you warm up before taking the flight.
- Surya Namaskar or Sun Salutation – Before you start with the steps to enter into a full flying pigeon pose, it is recommended to practice a minimum of 3 rounds of Surya Namaskar to warm up your body.
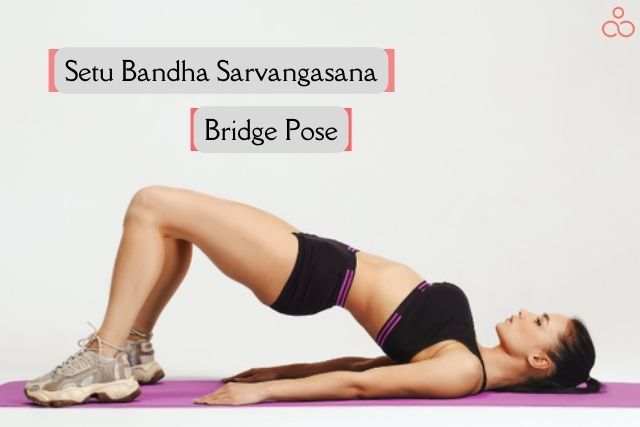
- Setu Bandha Sarvangasana or the Bridge Pose – You can prepare your glutes through this bridge pose. This pose helps strengthen the spinal muscles, neck, and shoulders, and also in bringing some balance to the body. It strengthens the arms, calves, ankles, and hamstrings too!
- Hip Rotations and Figure Four Stretch – The leg rotations from your hip joints help mobilize the hip and stretch the leg muscles. The closing figure four stretch helps improve the flexibility.
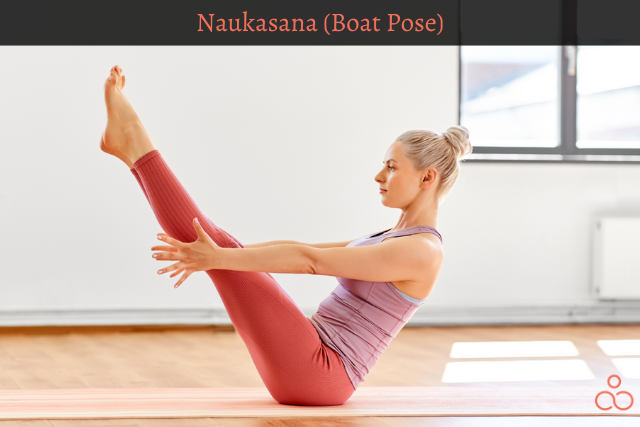
- Navasana or Boat Pose – This pose helps strengthen the hip flexors, spine, and abdominal muscles and stretches the hamstrings. It also develops a sense of self-assurance and confidence required for the flying pigeon pose.
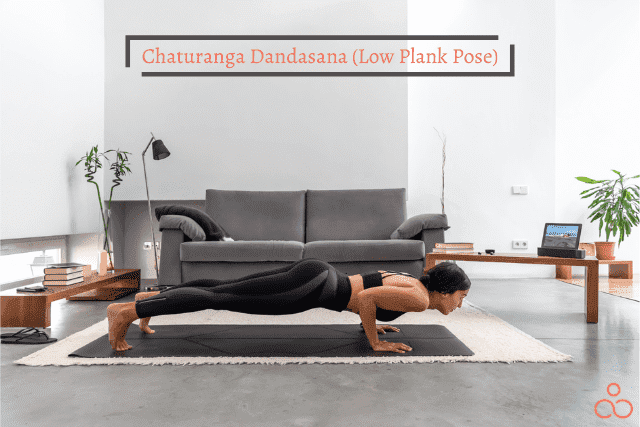
- Chaturanga Dandasana or Four-Limbed Staff Pose – This is very similar to the plank and helps in building the overall strength of the body. The most important aspect of this pose is that it works on the wrists, arms, abdominal muscles, and lower back, which are necessary to maintain posture later in the flying pigeon pose.
- Gomukhasana or Cow Face Pose – This seated yoga pose helps to relieve stress from the shoulders. It stretches the ankle and knees. It opens the chest and shoulders while working on improving the overall body posture.
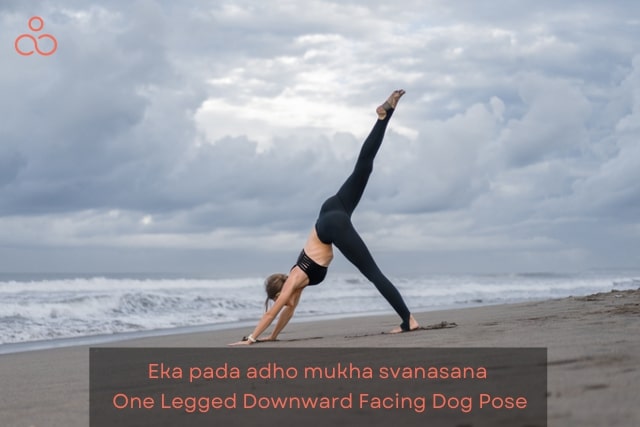
- Eka Pada Adho Mukha svanasana or One-Legged Downward Dog Pose – This pose helps lengthen the spine, strengthen the arms, stretch the legs, and build confidence to take the flight. It not only improves the core strength of the body but also helps in attaining stability.
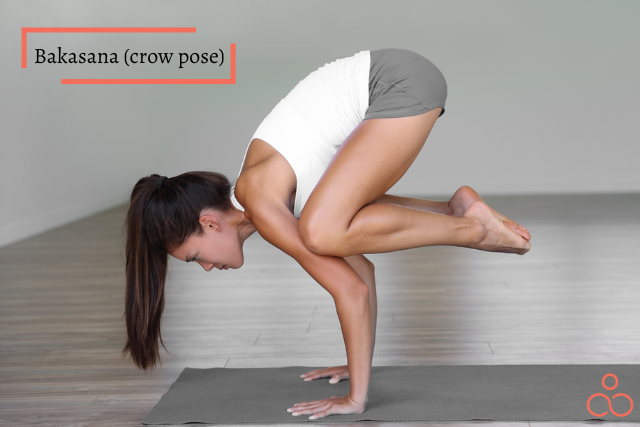
- Bakasana or Crane Pose – This pose is very close to the flying pigeon pose, and you might find this equally challenging. It helps in strengthening the wrists, arms, core, glutes, shoulders, and adductors. It stretches the muscle groups sufficiently and warms up your body for flying pigeon.
- Eka Pada Utkatasana or One-Legged Chair Pose – This pose improves core strength and opens the hips. It strengthens your legs and spine while grooming your body to achieve the right balance.
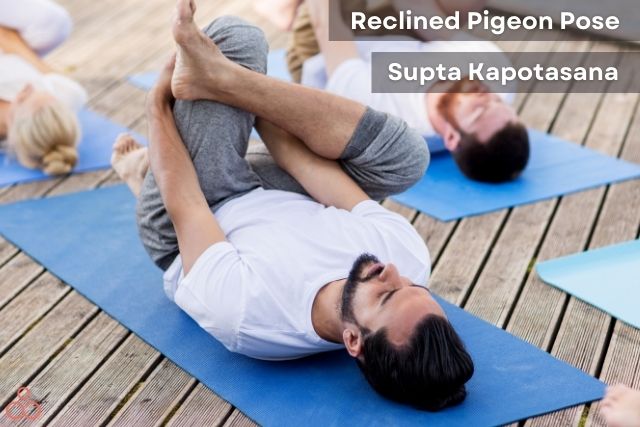
- Supta Kapotasana or Reclining Thread-The Needle – This variation of the reclining pigeon pose is significant to help open and strengthen the hips. It helps stretch the thighs and improves the flexibility in the lower back.
5 Step Sequence to Take Flight in Flying Pigeon Pose
Before starting with this pose, ensure you have yoga blocks for added support to your arms. Also, plan for a yoga cushion, a giant pillow, a fluffy blanket, or even a couple of bolsters below your face; you never know if you might crash and fall, which can happen all the time with new and challenging poses. But this preparation will keep you safe and act like a crash pad that can avoid injuries.
Mountain Pose (Tadasana) to warm up your hips: Mountain Pose, the foundation of all yoga positions, will teach you how to engage and contract your muscles while balancing on two feet.
- Begin by trying to stand with your feet parallel and at hip-width apart
- Distribute your weight evenly throughout your four feet ‘ corners
- Bring your palms in front of your chest and place them together
- Position your gaze on a single focus point on the ground to gain balance
- Engage your quadriceps by feeling your kneecaps
- Let your tailbone stretch toward the floor consciously. Your pelvic floor must be lifted
- Draw your belly button towards your rib cage and your spine to engage your core
Figure-Four Chair Pose to balance your weight: This posture establishes your arm stability and maintains your balance.
- Slowly balance your body weight on your left leg and cross your right ankle over your left knee from the mountain pose. Drop into a square four position
- Lean firmly into your right knee and externally twist your hip (moving the toes toward the right)
- To make a figure-four, hook your ankle across your left knee
- Deeply bend your left knee and lower your hips to the ground
- Ensure you are comfortable in this position before proceeding with the next step
Squatting Figure-Four to stabilize your arms: This step will help you develop a firm foundation in your hands and your bent leg to keep everything secure and in position as you prepare to take flight in the Flying Pigeon Pose.
- Position your left leg firm, bend further and begin to tilt your chest forward
- Fold your body over the right shin and place your hands shoulder-width apart on the floor. Alternatively, you can take the support of yoga blocks if you are unable to reach so low on the ground
- Spread the fingers of your palm wide enough and balance your body weight on your arm and left leg
- Grip well in the position and then move to the next step
Hook the foot and take your initial lift: The flying pigeon pose is a counterbalance pose where you go against gravity. It is crucial for you to position your right shin and to hook your right toes high up to your left arm. Your center of gravity will shift as you lean forward and work your core, allowing for a weight counterbalance that physically raises your foot off the floor towards reaching the complete posture, both in terms of strength and flexibility.
- Look ahead from your crouching Figure-Four position.
- Activate your core by elevating your pelvic floor and bringing your belly button in and up.
- Begin to lean forward in space, transferring additional weight into your hands by bending your elbows to form the almost 90-degree angle inside your arms (producing a Chaturanga-shape) and resting your right shin across this “shelf” you’ve constructed.
- Continue moving your weight forward until you achieve that magical equilibrium point (when your legs become light and easy to lift from the floor)
Full Flying Pigeon Pose: The entire stance is merely the frosting on the cake once you’ve achieved the first lift. Although it takes intense attention, strength, and flexibility, this position is more about weight balancing than sheer physical strength. To be able to go through trial and error (a.k.a. falls!) necessary to discover your balance, you’ll need a strong sense of humor and lightheartedness. Remember to place a few soft pillows or bolsters to protect your face and neck from unseen injuries.
- Return to your Initial Lift and locate a weight counterbalance by bending your torso forward in space
- Begin extending your left leg straight toward the rear of your mat at the same time (and even up toward the sky if you want an extra challenge)
- Continue pressing the floor away from yourself while extending your leg high
- Remain for a couple of breaths and release in reverse order
- Repeat the same sequence by alternating the legs
Variations and Modifications
Though we have discussed a set of preparatory poses and have also detailed a sequence of steps to achieve the full flying pigeon pose, you might still be interested to know some variations or modifications that might be helpful. So, here we are with some quick tips to guide you!
- Flying pigeon with blocks – If you find it challenging to bend sufficiently and position your palms flat on the ground, then you can take the support of yoga blocks. When your hips are tight, you might end up facing this difficulty. Having blocks not only supports you with your balance but also assists you in the correct body alignment.
- Flying pigeon with wall support – If you find it scary and extremely difficult to lift your foot off the floor, position yourself close enough to the wall. This way, you can be confident enough to take support with the wall behind, if necessary. You can use your yoga blocks here as well!
- Flying pigeon with one foot on a block – In this variation, you will be using only one block to support the leg that flies off later. Standing on this block will give a better balance, and lifting that foot off could be slightly more manageable.
- Flying pigeon with one shin on a block – If you can lift your bottom foot and extend it back, this variation could be helpful. Use a single yoga block and position it tall and vertical. Use this to balance the shin of your leg about to take off and extend back. This could be easier as the block gives you an additional height and push to take off!
FAQ’s
Is Flying Pigeon Pose hard?
Yes, it is! If you are an advanced practitioner or someone who wants to challenge your core strength, then go ahead and try it. But remember to try it under the supervision of a trained Yoga teacher.
Is the Flying Pigeon Pose bad for you? Why?
Practicing the Flying Pigeon Pose has immense health benefits. This is a highly complex and advanced-level yoga pose. If you have any of the below conditions, avoid this pose as it might aggravate or worsen your current state.
- Spinal problems like a herniated disc
- Arm and wrist injuries
- Chronic back pain
- Prior hip and knee surgeries
- Pregnant women
How to enter the full flying pigeon pose?
To achieve the full Flying Pigeon pose, you must follow a sequence of steps mentioned below.
- Begin in Tadasana or Mountain Pose
- Place your right ankle on your left knee and enter into a partial figure Four chair pose
- Slightly bend forward and push your hips back. Try to pace your palms on the mat to support and balance your body weight
- Shift the entire body weight to your arms, lock your right toes to the left arm and slowly extend your left leg
- Once balanced, take flight into the Flying Pigeon Pose by lifting your left leg in the air
- Hold for a few seconds and release from the pose in the reverse order
- Repeat on the other side
Why is Flying Pigeon Pose hard?
The Flying Pigeon pose resembles a bird taking a flight where the body’s entire weight rests on the hands while the legs remain up in the air, making it pretty challenging for practitioners to maintain the balance. Maintaining this pose needs significant core strength, which is usually acquired with time and practice.
Though the Flying Pigeon pose is challenging, it can be mastered with patience and perseverance.
What are the counter poses for Flying Pigeon Pose?
Some of the counter yoga poses are:
- Balasana or Child Pose
- Bhujangasana or Cobra Pose
- Front Lying Corpse Pose or Advasana
- Vinyasa is from an upward facing dog to a downward-facing dog
Can beginners do Flying Pigeon Pose?
Flying Pigeon Pose is considered to be challenging and tricky for newbie practitioners. Achieving this pose requires a certain amount of flexibility and core strength. If you are a beginner and have just started your yogic journey, this pose is not for you.
What is Flying Pigeon Pose suitable for?
Flying Pigeon Pose helps stretch your hips and lower back, which in turn helps with the flexibility of hip flexors and lower back muscles. This also supports the digestive system. In traditional Ayurvedic contexts, it is believed that emotions like mental stress and worry are located in these regions of the body. Hence, the Flying Pigeon pose could also help build robust mental health.
Conclusion
Now that you know this beautiful flying pigeon pose that makes you feel liberated and independent, try out and test your strength. Remember that there is nothing wrong with failing the initial few times. Get flying only once you think you are physically ready to challenge yourself!
