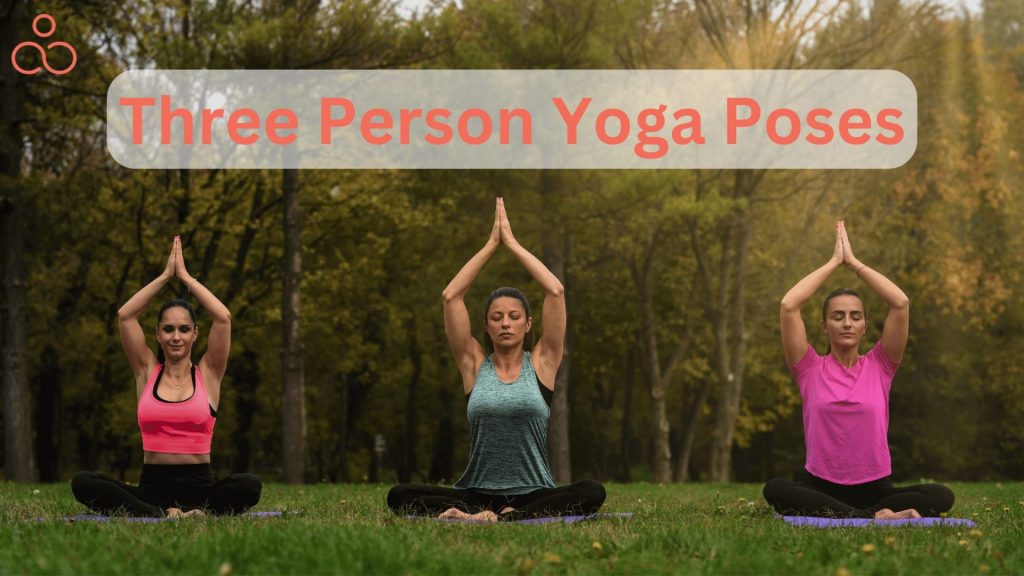
Namaste! Come fall in love with yoga all over again. Ready to take your yoga practice a notch up? Then Acroyoga is the way to go!We all know that one of the best aspects of yoga is spending quality time with yourself, finding your inner peace through a life-changing form of exercise. It’s a thrilling way to take your practice to the next level, but make sure to take the necessary safety precautions before trying out any of the most effective Acroyoga poses. Want to know why this hybrid mix of three person yoga poses is a thing now? Simple: Because it’s fun to fly! We’ll be your tour guide throughout this journey to make sure you have a safe, yet exciting experience!
Meaning of Acroyoga
Acroyoga is the perfect blend of yoga and acrobatics – combining the grounding presence and mindfulness of yoga with the technique and athleticism of acrobatics. It’s a partner-based exercise that uses gravity and body weight to stretch and strengthen your body to heights you never thought possible. The practice focuses on building trust, communication, and connection with another person and encourages you to work together to create amazing poses. You’ll also have fun along the way! With Acroyoga, you’ll take your physical capabilities to the next level while having a blast. It helps you to connect with yourself and your fellow yogis during this unique session. You’ll master acrobatic techniques—learning how to lift and be lifted, and the best alignment for safety and ease.
Acroyoga was initially founded in 2003 by Jenny Sauer-Klein and Jason Nemer who were a combination of dancer and yogi respectively. Acroyoga is something way more than a regular yoga session. It is a partner yoga form that involves advanced yoga and acrobatics with a massaging effect that helps all the individuals engaging in the session. It is usually made up of 3 person yoga poses bringing in a feel of a small community instantaneously. Initially you start the session alone and slowly start engaging with a partner sequence or a group session work. The entire Acroyoga is defined with yoga poses for 3 where three different people are involved in the sequences. The first person will be the lifter who would be closer to the base of the ground, the second would be the person being lifted balancing up in the air, and a third person who visually supports and actively engages in the safety and flow of the sequence.
Roles In Acroyoga
Base – The base is the person closest to the ground. They can either be lying with their back on the ground, standing or lying on their stomach (belly basing). The main aim of the base is to provide a stable and secure foundation for the flier to stay balanced on top. Good bases are strong, stable, and flexible to give the flier a solid base.
Flier – Do you want to soar above the clouds – literally? Then you should become a flier! A flier is someone who stands on top (or is held up) by another person. The flier must be aware of its own and the base’s movement and position, and stay balanced in the air. To be a successful flier, you need strength and body awareness, as well as the ability to move fluidly and keep a stable shape for the base to support. So why not take flight and give it a try?
Spotter – The spotter is the guardian angel of Acroyoga – their job is to make sure the flier is safe and sound. They should remain attentive and close by at all times, ready to catch a potential dive or provide hands-on support to both base and flier until they feel comfortable enough to go ahead with a less intense spotting technique.
Different types of Acroyoga
Acroyoga techniques are broadly classified into two major categories: Solar and Lunar. Let us briefly understand the underlying difference between these two patterns.
L-Basing
In this technique the flying time is relatively longer as the body balances in an L shape. The base supports the flier by bending forward and allowing the flier to lean and take support on the base’s back.
Standing
In this technique the flying time is relatively shorter as the base balances the weight of the flier using their hands and feet to a great extent.
Solar Style Practice
It investigates and tests your strength and adaptability in various positions and developments. It focuses more on acrobatics and empowerment in which both individuals are actively involved. It’s more dynamic in nature. This type of Acroyoga again attracts two categories of people. The fun factor makes it attractive to those who are new to yoga and are curious about it in a different way. It also allures long-time yogis who are looking for a new angle or challenge to their practice and savor the therapeutic benefits of both the massage and being upside down.
Lunar Style Practice
It takes care of, soothes, and re-establishes the body through Thai yoga kneading and flying therapeutics strategies. In this practice, there’s a giver and a receiver. The giver, who serves as the foundation, supports the weight of the receiver while manipulating their body to stretch and twist. On the other hand, the receiver simply relaxes and lets the control go. It’s usually best to start with lunar practice, especially for beginners. One person gives the massage, while the other one lies back and lets them do the work. This is the perfect way to get started with massage, as it helps the receiver feel safe and comfy right away.
Underlying Principle of Acroyoga
Acroyoga has two important principles to learn when you’re starting out: bone-stacking and counterbalancing.
Bone-stacking
It means that the base and flier’s body parts are positioned directly on top of one another to form the most secure and efficient base in each posture. When an Acroyoga pose is bone-stacked exactly it takes much less effort to stay in the pose.
Counterbalancing
It is when the base and flier do not align directly, but instead, rely on each other’s weight to maintain equilibrium. Counterbalancing is achieved when one person’s weight is balanced with the other person’s weight the opposite. This requires more skill and is more complicated than bone-stacking.
8 Best Benefits of Acroyoga
Builds Strength
As you have seen, three-person yoga poses require a lot more strength than solo or couple yoga poses. We also recommend the base to be the strongest one, because that is the foundation of your modified pose. You are no longer only in charge of your own body weight, but also supporting and balancing each other’s body weight. This requires flexibility and deepened strength.
Increases Flexibility And Lowers Back Pain
There are multiple physical benefits to doing yoga. In particular, 3-person yoga will do wonders for your core strength. But one of the most significant benefits has to be back pain relief. If you don’t already know, yoga includes inversion poses that decompress your spine, helping immensely with back pain. Most of the three-person yoga poses in Acroyoga will put you on the road to back pain relief.
Enhances Your Focus
It is important to stay sharp and vigilant when it comes to the safety of yourself and your partner. It doesn’t matter if you’re a or a base; you need to be aware of every motion to stay focused. This can help you hone your concentration. Acro yoga can help to boost focus and hone your cognitive abilities. Research has found that regular practice of this form of yoga can help to bring clarity of thought and an increase in productivity. It is a great way to sharpen your mind and have an enjoyable time doing so.
Enhances your ability to resolve the dispute
Acroyoga gives you the tools to peacefully solve any argument that may arise. It also helps you to live with the conflict if you can’t come to a resolution. This is because acrobatics requires a good connection between the two partners and this can’t happen when there is conflict in the air.
Enhances Connection with Your Spouse
Acroyoga is a great way to enhance the existing relationship between you and your partner, as you are entrusting them with your safety while doing the activity. It’s a great opportunity to deepen the bond you already share.
Enhances Your Flexibility
The most noteworthy advantage of starting acrobatic yoga is improved flexibility. Acroyoga includes almost every single joint and muscle. Doing Acroyoga postures allows you to work on each of your body parts from head to toe. If your muscles are tight at the beginning, you can do Acroyoga for beginners and start stretching them.
Enhances decision-making capability
Perfecting your partner’s dance moves is no easy feat! To stay on the same page, you have to be extra attentive to their movements and anticipate when you’ll have to make a quick decision to adjust your own steps. With continuous practice, you’ll be able to develop lightning-fast reflexes and make sound decisions in a jiffy.
Enhances confidence
Acroyoga can bring about an increase in your self-confidence and assurance. Research has demonstrated that regular Acroyoga activities can make you aware of your inner strengths, as well as granting you more self-esteem. Participating in Acroyoga will help you to get a better understanding of your capabilities, as it demands a lot of commitment and courage to complete.
Enhances the calmness of your mind
Yoga can be an effective way to combat stress and clear your mind. It can help you find a sense of peace and relaxation, allowing you to focus on your breathing, increase body awareness, and cultivate a positive attitude. Practicing yoga can be a great way to reduce anxiety and relieve stress.
5 Lessons To Learn From Acroyoga
- Acroyoga is the perfect way to explore trust, communication, and a whole new skill! You’ll get to take your body, mind, and heart to new heights.
- Acroyoga is a distinctive style that offers you the chance to explore something new. It isn’t just a physical practice; it can also challenge your mental and emotional strength.
- It helps you to expand beyond your comfort zone and form lasting connections.
- It helps you explore the power of gravity, the grace of movement, and your body’s inner strength to navigate a range of postures and scenarios.
- It helps you to embark on an incredible journey of self-healing, as you open yourself up to the power of love, trust, connection, and therapeutic touch. It’s not just about the physical – the benefits go much deeper and wider.
What To Expect From Acroyoga?
If you are all set to dive into the world of Acroyoga then here’s a list of things that you can expect from it:
- It will connect you to yourself and then other bodies through partner yoga or group work.
- You’ll be learning to lift each other and be lifted, plus the alignment you need to do it all safely and with ease.
- Plus, you’ll never be alone – there are always at least three of you! One to be the base, one to be the flier, and one to be the spotter who makes sure everything’s safe and helps out when needed.
Basic Acroyoga Poses
Eager to get into Acroyoga? These poses are excellent ways to start, introducing you to the practice and getting you used to the unique issues you’ll face along the way. Grab a buddy and you’re all set to experiment with some new postures, and don’t forget to have a blast! For more inspirations for Yoga poses with your bff, then this article is for you.
1. Partner Forward Folds is an enjoyable way for both partners to stretch out their backs and hamstrings. This affords a deep stretch and is an ideal activity for those looking for something light and fun.
How to do:
- Start by standing back to back and spread your feet a bit wider than hip-width apart.
- Hook elbows with the base underneath.
- Then the base begins to lean forward, keeping its back straight and torso at hip level while the flier goes back and lifts off the ground.
- You can either bend your knees into your chest or stretch them up towards the sky or in a wide straddle.
2. The Jedi Plank is a great exercise to do with a buddy if you’re looking for a challenging core workout. Not only will you strengthen your core, but you can also bond with your partner while you work out together.
How to do:
- The base will begin by lying on their back, with their legs extended and arms relaxed at their sides.
- The feet should be spaced hip-width apart. The flier will then bend down and take hold of the base’s shins.
- One foot at a time, the flier will be lifted off the ground, assisted by the base, who will be grabbing their ankles with their hands.
- Both flier and base will be keeping their arms extended, and the flier will be in a position that resembles a Plank Pose.
- At the same time, the flier will be raising their hips to achieve an upside down L shape, while the base is raising their torso off the floor and stretching their arms up, still holding on to the flier’s ankles. Together, the two will form a box shape.
3. Folded Leaf is a unique way to get your flier off the ground. This technique helps to create a sense of trust and familiarity with the sensation of flight. Try it out and see the difference!
How to do:
- Get into the starting position of the Plank Press with the base’s feet at the hips of the standing flier.
- Extend the arms of the flier up, then bend at the hips and grab the knees of the base.
- Lower the torso by bending the elbows, and the base will keep the shoulders of the flier steady.
- The base will then flex the knees and bring the flier forward so that the two of them are stacked over each other.
- From there, turn the toes out and straighten the legs, lifting the flier from the ground.
- The flier’s hands should stay on the base’s knees and the legs should remain heavy. The base should have a slight bend in the knees for balance and not lock the legs out.
4. Foot to Hand Pose provides you a great opportunity to practice your balance and experience the sensation of lifting somebody else’s weight. It’s a unique and creative way of honing your stability while having fun.
How to do:
- The base will begin by lying on their back, and extending their legs so that their body makes an L shape.
- Next, they should bend their elbows, so that their forearms are facing up, with their wrists stacked over their elbows.
- The flier will start standing near the base’s head and grab hold of the base’s feet for support.
- Then, the flier should step their right foot to the base’s right hand and repeat on the opposite side.
- The base should then grab the flier’s heels, keeping their elbows on the ground and their forearms in a straight line.
- Once balanced, the flier can let go of the base’s feet and stand up tall, while keeping their hands at their chest or on their hips.
5. Whale Pose is an invigorating posture that fortifies the muscles of the back and stretches the shoulders, chest, and throat. It likewise fortifies abdominal muscles and core and animates digestion and disposal.
How to do:
- The base should start by lying on the floor, with their back on the ground.
- The flier should stand near the base’s shoulder, facing the base.
- The base should then grab the flier’s ankles, and bend their knees towards the chest.
- This will make it easier for the flier to lean back onto the base’s feet.
- The base should then place the soles of their feet on the flier’s shoulders, having the length of their feet run down onto the shoulder blades and mid-back.
- Finally, the base and flier will work together to lift the flier up.
- The base should straighten its legs and the flier should be lifted up by the ankles from the base’s arms.
6. The Front Plank exercise takes Plank Press to the next level, allowing the participant to completely raise up off the ground. This requires the person to be creative and unique, while still retaining an informative, yet informal tone.
How to do:
- Begin in Plank Press, with the base’s feet planted firmly on the flier’s hips.
- The flier should reach out, take hold of the base’s hands and straighten their arms.
- The base then bends their knees into their chest and the flier leans forward, getting ready to ascend.
- The base will then push off, sending their legs straight up as the flier lifts off.
- Both partners must hold hands, providing mutual support.
- The flier must stay engaged in their core and extend their legs, pointing their toes at the ground.
7. Chair Pose on Shins is the perfect way for strength and coordination. It’s a powerful exercise that will challenge both the base and the flier to build up leg strength and maintain balance.
How to do:
- The base will begin in a seated posture, with their legs bent and feet flat on the floor.
- They should then extend their arms above their head.
- The flier will then stand facing the base, placing the ball of their right big toe on the base’s right shin and holding the base’s hands for support.
- The flier will then place the left foot on the left shin of the base.
- After that, the flier can stand and let go of the base’s hands.
- When they gain their balance, they can bend back into Chair Pose with their arms reaching past their ears.
- The base can then take hold of the top of the flier’s feet.
8. Front Bird Pose is an Acroyoga staple and the perfect place to start learning some acrobatic flying.

How to do:
- The base should lay on its back with its legs parallel to the ground.
- Both feet should be placed on the flier’s hips by the base.
- The flier should stand near the base’s feet. After that, the base should hold the flier’s arms and straighten their legs, lifting the flier.
- Now, the flier should keep their toes pointed out and balance them.
- Lastly, the base should let go of the support and the flier should raise their arms in a flying position.
9. Back Bird Pose gives fliers a wonderful antigravity backbend and gives the base a chance to build strength and get their alignment perfect. Instead of facing the floor, the flier looks up at the ceiling.
How to do:
- The base should start off in a seated position.
- The flier should turn her back to the base’s legs, and the base should bend their knees so the flier’s buttocks rest on their feet.
- The flier should then extend their arms backward, with the palms facing outwards, and grab the base’s hands.
- The base should then straighten their legs and lift the flier, which should then straighten their left leg and bend their right leg.
- The flier should arch backward in a half backbend and let go of the base’s hands, spreading their arms out.
10. Fish on a rock is a calming Acroyoga posture. It’s great for widening the hips and the back of both the base and the flier.
How to do:
- The base will transition into Child’s Pose, extending their hands out in front of them and their knees out wide as they rest their forehead on the ground.
- The flier then lies on their back on top of the base, arching their back over the bases for a deep stretch.
- The flier can extend their legs and let their arms reach out to the sides, completely surrendering to the pose.
Try Out the Yoga Poses for Three People
Always remember to warm up your body before attempting an Acroyoga pose. You have to be careful of your partners as well. Your imbalance can cause an injury to everyone.
Stretch it out first, wake up your muscles, and prepare yourself physically and mentally. Be confident with your body strength. Flying takes trust and reassurance. We also recommend you hold your partner’s hand as you stretch and breathe to exchange each other’s energy. Now let’s get into the poses. We will start with the easy ones.
Easy Yoga poses for three People
Stacked Up Plank Pose
Difficulty Level: Easy
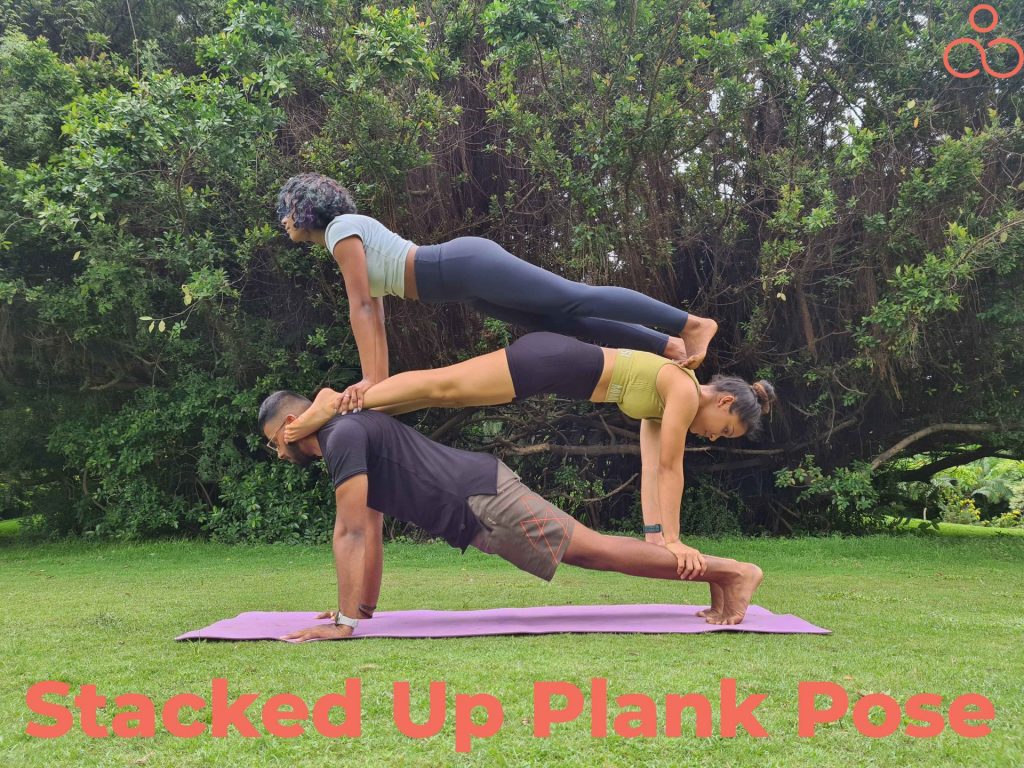
- Before getting started, ensure that all the three of you are comfortable holding the plank pose for at least a minute.
- Let the strongest of the three be the base and begin stacking into an alternating plank pose. The base must hold their joints in the right position without bending to maintain the right balance.
- The middle and the upper fliers must try to keep their bodies light and aligned straight without any folds or bends. The position of the their hands to the underlying person’s ankles and ankles to the underlying person’s shoulder must be right to hold the balance.
- To exit the pose come back the same way down starting with the top flier first.
Benefits of Practicing this Pose: It builds Core Strength and Arm Strength for every individual Involved.
Evolving Mountain Pose
Difficulty Level: Easy
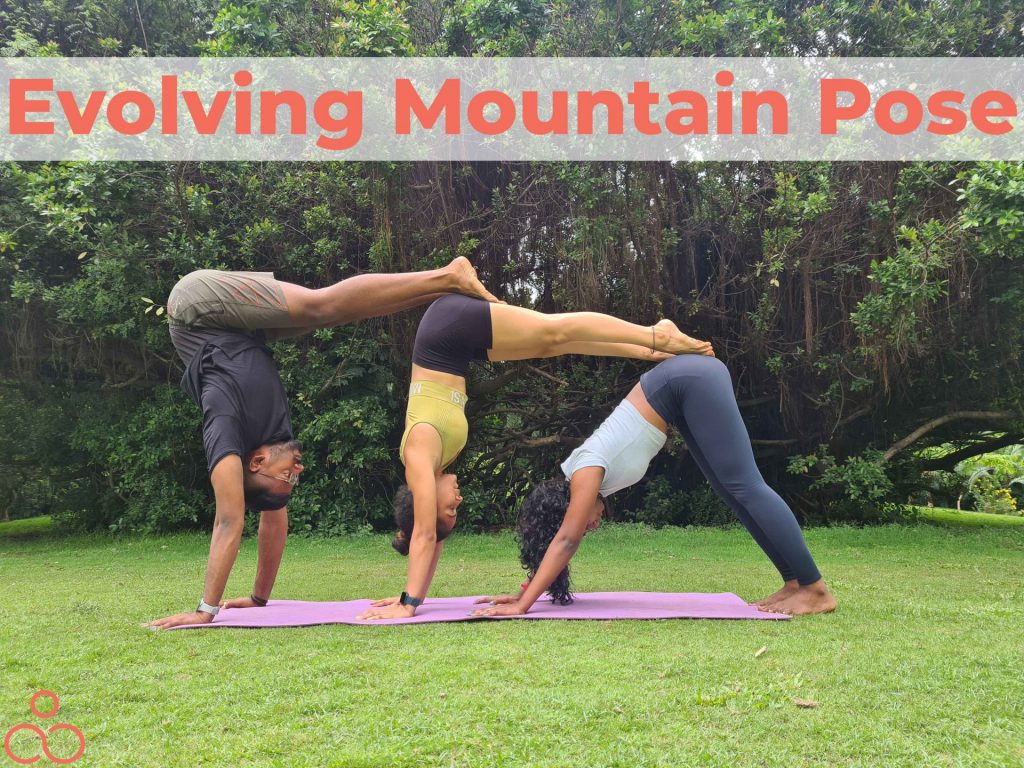
- In this combination pose for three people, the base will get into the mountain pose with their knees straight and shoulders in line with the torso.
- The middle and last yogis must position themselves in line with the arm position of the base. Now, the middle yogi stacks their feet on the base’s hip with their toes pointing outward and their palms planted strongly on the ground, in line with the base’s hand position.
- The last yogi must build into the pose the same way as the middle yogi, but the hand position will be slightly farther away from the middle yogi to create a balance.
- To exit the pose come back the same way down but starting with the third yogi first.
Benefits of Practicing this Pose: It builds Core Strength and Arm Strength for every individual Involved. It also helps to improve Hamstring Flexibility for the one who’s feet are on the mat.
Mountain’s Pyramid Pose
Difficulty Level: Easy
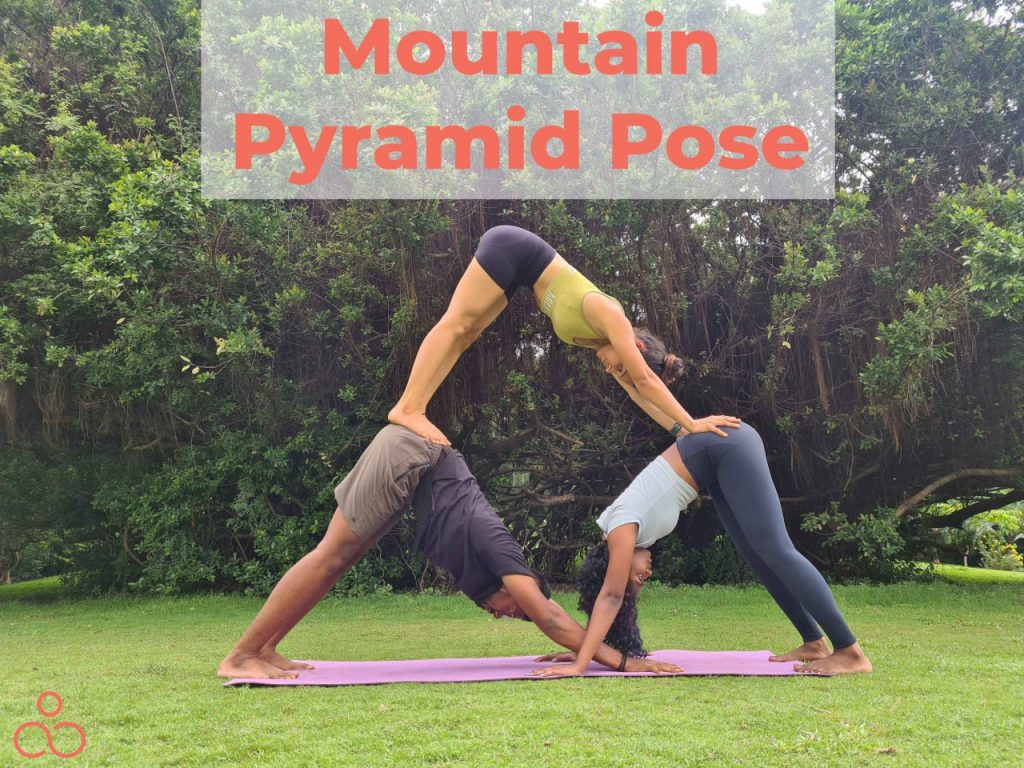
- In this pose there will be two strong bases. They begin the pose by positioning themselves opposite to each other in mountain pose.
- The third yogi must start building the mountain pose on the base’s hips. Begin with the hands and slowly climb up with the legs and form the balanced mountain pose that looks like a pyramid.
- To exit this formation, the third yogi on top must slowly bend their knees and get down to allow the base’s also from releasing from their poses.
Benefits of Practicing this Pose: It builds Core Strength, Hamstring Flexibility and Arm Strength for every individual Involved.
Hanging Bat Pose
Difficulty Level: Easy
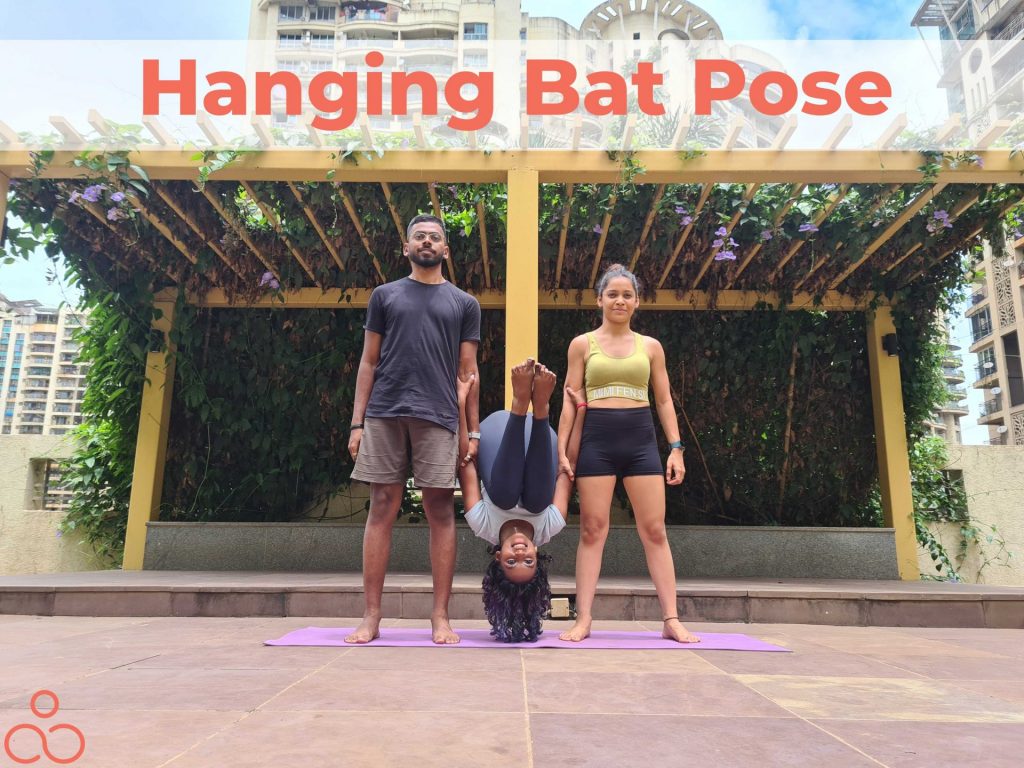
- Try this formation with the two yogis at the extreme sides and one in the middle, all in a line but facing alternate sides.
- The middle yogi must bend forward and raise the hands slightly upward to create a lock with the hands of the yogis on the sides.
- The grip must be aligned in a right symmetry and with the right hold and firmness at the elbows.
- The middle yogi must now try to lift off the feet and tuck their knees and heels closer to their chest and hips respectively.
- Now, the middle yogi must slowly try an inversion with the support of the yogis on the sides and hand like a bat from the branches of a tree!
- Release from the pose, starting from the middle yogi by straightening their legs and bringing themselves back on their feet. Once the middle yogi is stable on ground, the yogis on the extremes can release the elbow hold.
Benefits of Practicing this Pose: It builds Arm Strength for both the individuals who are standing and helps to improve inversion practice and builds core strength for the one who is upside down.
Chair Supported Thighstand Pose
Difficulty Level: Easy
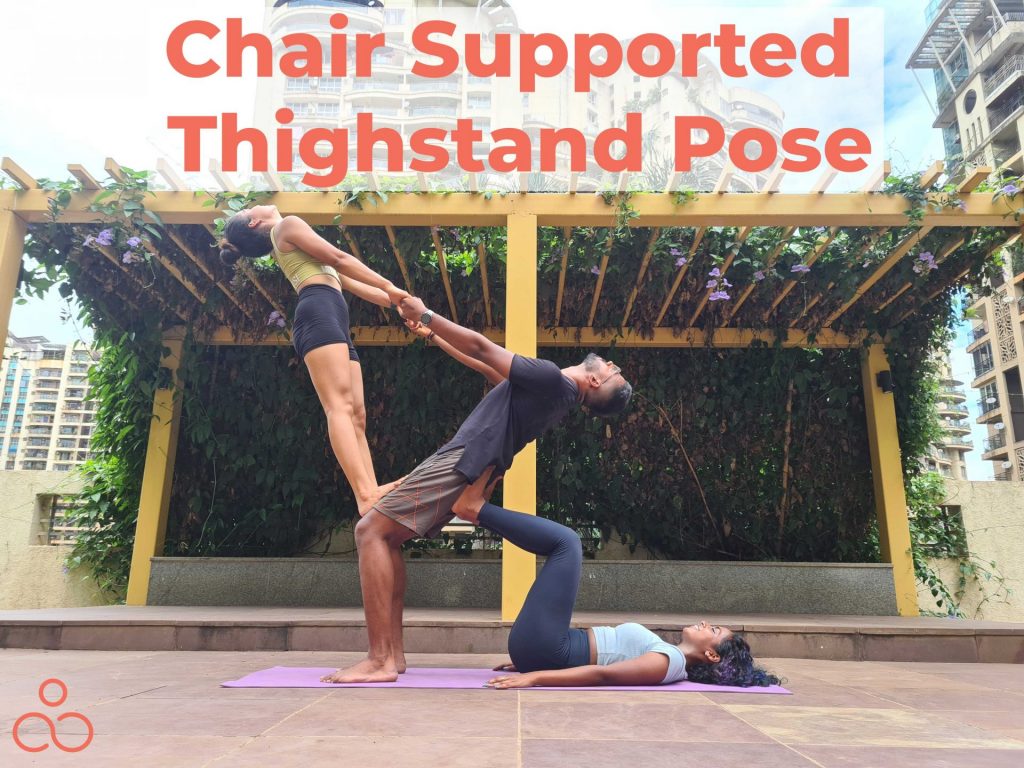
- In this combination pose, there would be 2 bases creating the balance for the entire pose. Start by constructing the pose from base 1 and slowly build up to the flier.
- Base 1 must lie down on their back and bend their knees to position on the hipline of base 2, who would be standing at the knee length distance of base 1 with their back facing the base 1.
- Base 2 must slowly bend their knees creating a balance like an axil between base 1 and the flier who must climb up.
- Base 1 must provide adequate support to base 2 as they bend back to lift the flier off.
- The third yogi or the flier must place their feet firmly on the thighs of base 2 and climb up.
- The base 2 and flier will have a strong hand lock creating a good body balance. They must try to hold strong enough and it should look like they are pulling each other in opposite directions with their heads bent back and eyes gazing upward.
- The counter balance of base 2 and flier will be constantly supported by the base 1.
- To release this pose, the flier will ease out and get down off base 2. Later base 2 will slowly move forward and base 1 can straighten and stretch out their legs rom the folded position.
Benefits of Practicing this Pose:
- For Base, it will help to improve sense of counter balance, arms strength and leg strength.
- For flier 1, it will help to improve leg strength.
- For flier 2, it will help to improve sense of counter balance and arms strength.
Intermediate three person Yoga poses
Camel Stacked Pike Pose
Difficulty Level: Intermediate Pose

- To try this combination pose, decide amongst yourselves as to who would be the base, flier 1, and flier 2.
- The base must lie down on the mat with knees bent and hands raised up in the air.
- Flier 1 must move in to the camel pose with ankles positioned slightly wide apart alongside the base’s head. The base’s palms must support the shoulder plates of flier 1 and help them to bend their back with hip lifted slightly upward.
- Flier 2 must build on both the base and flier 1. The palms of flier 2 must be positioned firmly on the knees of the base and the ankles of flier 2 must be supported by the hand hold of flier 1, creating a pike line.
- To release the pose, follow the reverse order sequence, flier 2 first, flier 1 second, and the base at the end.
Benefits of Practicing this Pose:
- For Base, it will help to build arms and legs strength.
- For flier 1, it will help to improve spine flexibility and arms strength.
- For flier 2, it will help to improve core strength, arms strength and inversion practice.
Parade Stance Trio Pose
Difficulty Level: Intermediate Pose

- To try this combination pose, you need one base and two fliers. The base must position themselves in the center of the mat with flier 1 and flier 2 positioned before and after the base forming a line. All the three yogis must be facing the same direction.
- The base must stand with legs spread wider than shoulder distance and loosen their arms to support the fliers as they climb. They must position themselves firmly on the ground to create the right support and balance for flier 1 and flier 2.
- The flier 2 must start building the pose by climbing up on the base’s shoulders and sit there planting themselves facing forward just like the base.
- The flier 2 will straighten their legs forward and lock their ankles under the armpits of flier 1, who is positioned right in the front.
- Once the positions of base and flier 1 are locked and intact, the flier 1 will now take the flight and lift their body off the ground.
- Flier 1 must wrap their legs around the base’s waistline while receiving a support from the base.
- Once the positions are all held tightly, the base must do a sumo squat and hold to create a better balance. Flier 1 must lean forward opening their chest and flier 2 must lean slightly backward stretching their spine.
- Base can extend their arms sideways and lock hands with flier 1 for a better balance.
- To exit the pose flier 1 must release and come down first, followed by flier 2, and lastly the base can straighten from their squat position.
Benefits of Practicing this Pose:
- For Base, it will help to build overall strength.
- For flier 1, it will help to improve spine flexibility.
- For flier 2, it will help to improve leg strength.
Triple Chair Twin Pose
Difficulty Level: Intermediate Pose

- To try this triple chair twin pose, you need one base and 2 fliers.
- It is recommended for the base to have a good core strength and also be a pro at holding the chair pose. The base must position themselves in the center of the mat and move in to the chair pose.
- The fliers would stand on the sides of the base facing opposite to each other. Flier 1 and flier 2 must hold their hands and prepare themselves to get ready for a climb up.
- The fliers will climb up on either sides by positioning their feet closer to the inner torso on the base’s thighs. The base must support this by holding the knee joints of the fliers using their hands from below.
- Once the fliers positions themselves completely on the base, they will have to slightly bend their knees and attain the chair pose. They will continue to keep their hand lock intact to maintain the balance.
- To release from this combination pose, the fliers must descend together to maintain the counter balance.
Benefits of Practicing this Pose:
- For Base, it will help to build overall strength, more leaning towards leg strength.
- For flier 1, it will help to improve leg strength.
- For flier 2, it will help to improve leg strength.
Tri Counterbalanced Thighstand Pose
Difficulty Level: Intermediate Pose
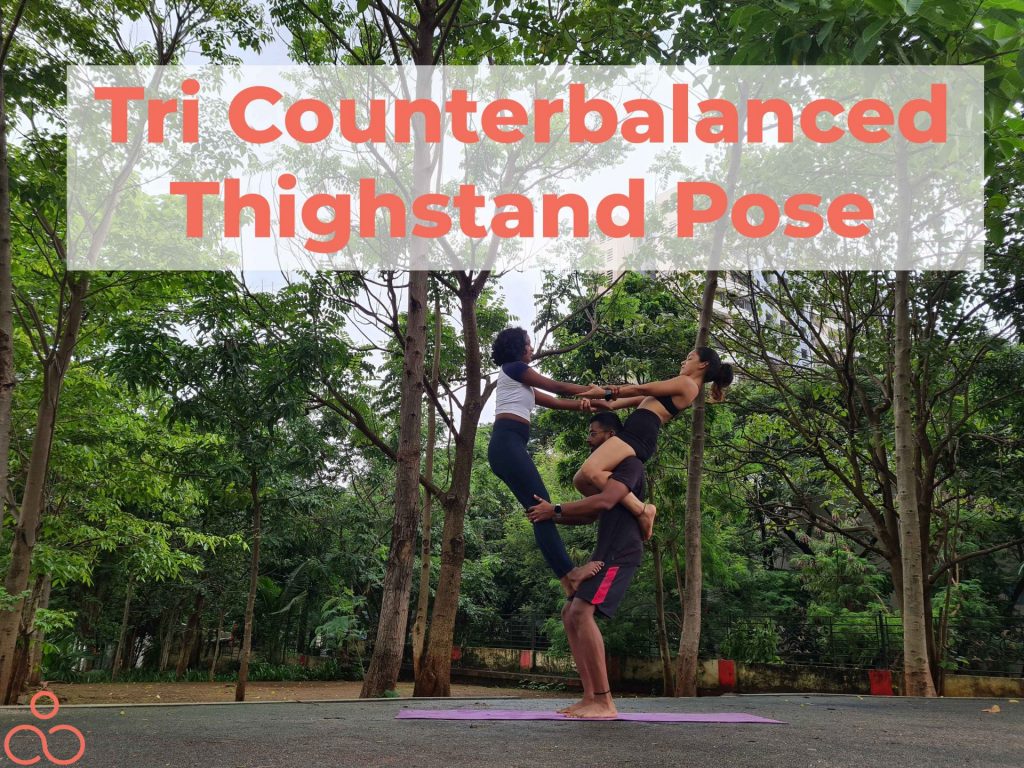
- To try this combination pose, you need one base and two fliers.
- The base must stand in the center of the mat with both the fliers standing in the front and back, both facing the base.
- Flier 2 must slowly climb up on the base’s shoulders and stabilize their position by sitting there and locking the ankles to the back of the base.
- The base should slightly squat and bend to support the flier 1 to get in to the position.
- Flier 1 must position their feet on the base’s thighs, hold hands with flier 2, and straighten their position.
- The base must hold the knee back of flier 1 while flier 1 slightly bends back to create the support and balances the poses with a constant hand pull with flier 2.
- To get down from the pose, the base must squat down and fliers slowly descend one after the other.
Benefits of Practicing this Pose:
- For Base, it will help to build overall strength, more leaning towards leg strength.
- For flier 1, it will help to improve sense of counter balance and arms strength.
- For flier 2, it will help to improve sense of counter balance, arms strength and leg strength.
Double Bird Pose
Difficulty Level: Intermediate Pose
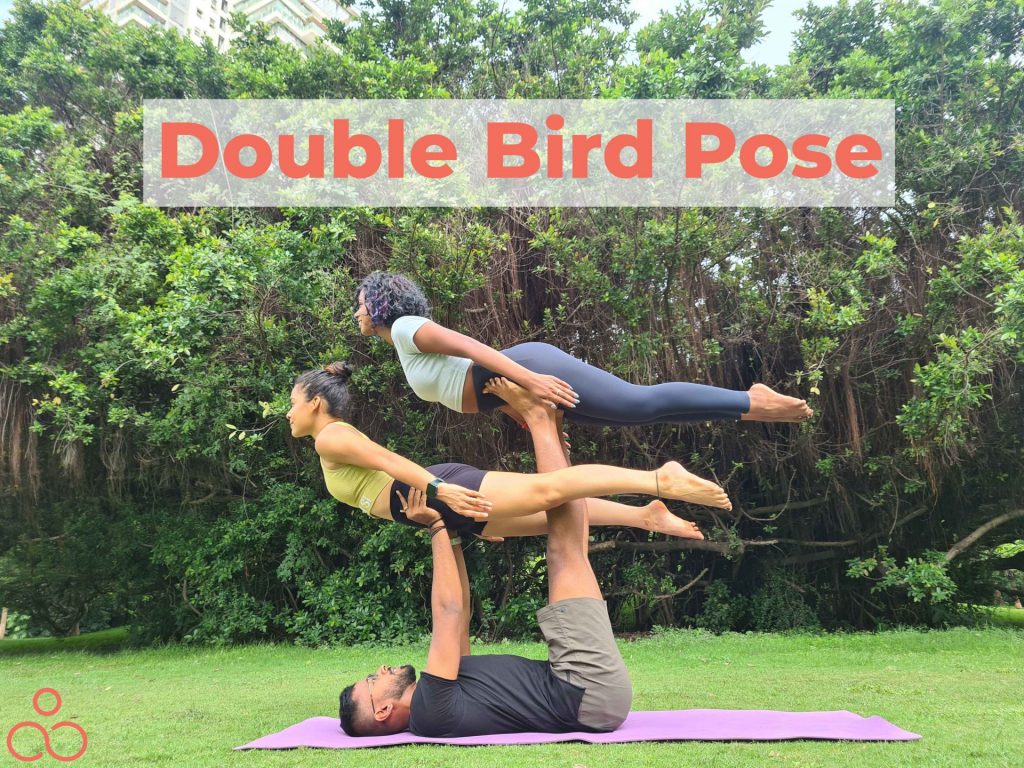
- Just like the name says, this pose requires two birds (fliers) and one trunk (base).
- To begin this combination pose, the base as well as the fliers must have a strong core strength and warm-up for a minimum of 30 seconds individually.
- After the subtle warm-up, the actual pose building begins. The base must begin by lying down on the mat with their knees bent.
- The flier 1 must lean forward, shifting the weight on base’s feet. As the base lifts the flier 1 up straightening the knees toward the sky, they must actively lift the upper body and straighten their body with the legs put together.
- The flier 2, lower bird, must get into a plank pose above the base’s torso positioning their waist over the shoulder line of the base. The base must support with their palms on this flier’s waist and lift them up. Flier 2 must equally lighten their body , straighten up, and keep their legs together.
- To exit from this pose, the flier 2 must come down first and the the flier 1 must follow.
Benefits of Practicing this Pose:
- For Base, it will help to improve arms strength and legs strength
- For flier 1 & flier 2, it will help to improve sense of counter balance, core strength and overall strength as it requires continuous activeness of the entire body.
Double Throne Pose
Difficulty Level: Intermediate Pose

- To try this Double Throne Pose, we need one base and two fliers. The base must have a great core, arm, and leg strength while the fliers 1 and 2 must be flexible enough to stay in malasana and hold the Goddess/Sumo-Squat position.
- The base begins the pose by lying down flat on the mat. They must bend their knees and adjust themselves to support flier 1 with their legs.
- The flier 1 must stand just behind the hips of the base and spread their legs wide into the goddess pose. With the support of the base’s legs under the inner thighs, the flier 1 will take off from the ground and try to balance their position by locking both the ankles around the calves of the base.
- The flier 2 will position their legs on either sides of the base’s chest and bend their into the squat position. With the support of the base’s hands under the inner thighs, the flier 2 will take off from the ground and try to balance their position by locking both the ankles around the triceps of the base.
- The yogis can release this pose in reverse order, starting with flier 2 and then flier 1, before the base could finally stretch and relax.
- Note – The base can practice lifting individual fliers on the legs and hands in throne pose to prepare themselves for this pose. Practicing the Double Bird Pose can also make it comfortable to perform the Trio Acro Pose.
Benefits of Practicing this Pose:
- For Base, it will help to improve arms strength and legs strength.
- For flier 1 & flier 2, it will help to improve leg strength and overall strength as it requires continuous activeness of the entire body.
Twin Upward Dog Pose
Difficulty Level: Intermediate Pose
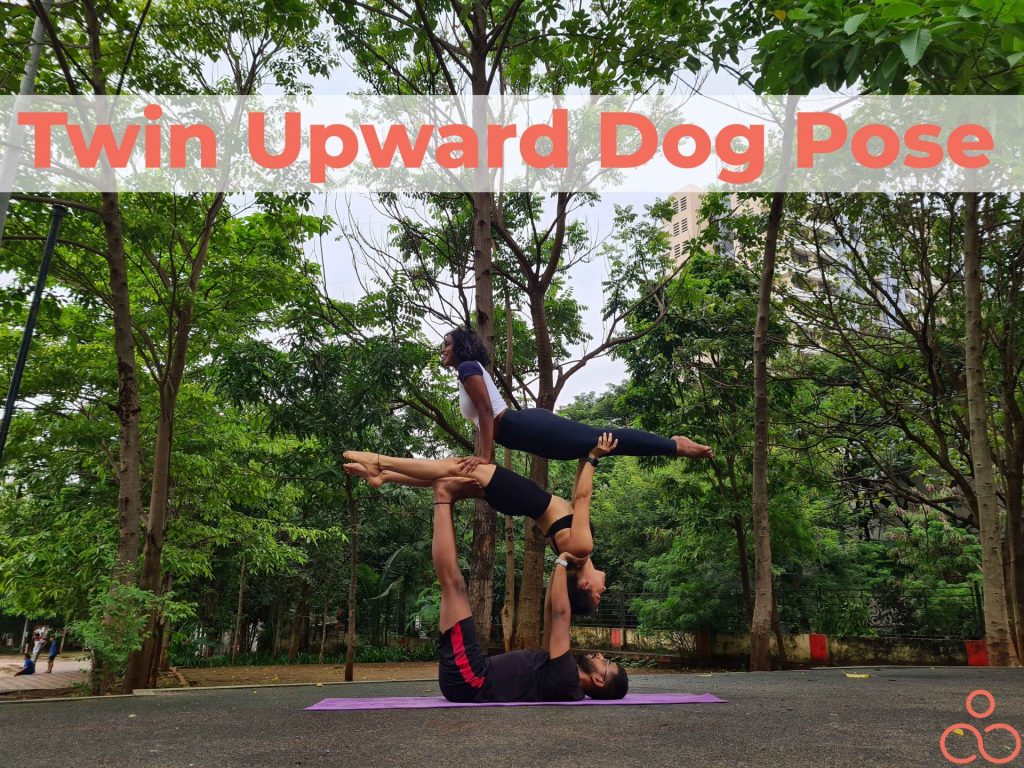
- To try this Twin Upward Dog Pose, we need one base and fliers. This pose demands good spinal flexibility of the fliers and immense strength of the base.
- To begin the pose, the base must lay down on the mat and bend their legs to prepare themselves to support the flight.
- Flier 1 must position themselves just behind the hips of the base looking at the opposite direction. With the support of the base’s legs at the back of their knees, flier 1 must bend backward extending their hands towards the base.
- With a good hand balance between the base and flier 1, the base must proceed to lift the flier 1 in a partial table-top position. Gradually, the base must adjust the hand grip from hand to shoulder blades, progressing into the Upward Facing Dog Pose.
- To support the flight of flier 2, the base must slightly lower the height of flier 1. In the meantime, flier 2 must stand right in front of the face of flier 1 and face towards the feet of flier 1.
- Flier 2 will take ascend with the support of flier 1’s hands right above the knee joints. Flier 2 must gradually bend forward and get in to the complete pose by balancing their hands on the thighs of flier 1 and actively lifting and lightening the body.
- Once both the fliers ascend in to the respective postures, the base must straighten up and move the pose slightly up in the air.
- To release from this pose, the base must lower the height, and flier 1 must adjust their elbows to allow the flier 2 to exit. Right after that, the base must lower their stance a little more for the flier 1 to exit.
Benefits of Practicing this Pose:
- For Base, it will help to improve arms strength and leg strength.
- For flier 1 & flier 2, it will help to open up the back and improve arms strength.
Trio Namaskara Pose
Difficulty Level: Intermediate Pose
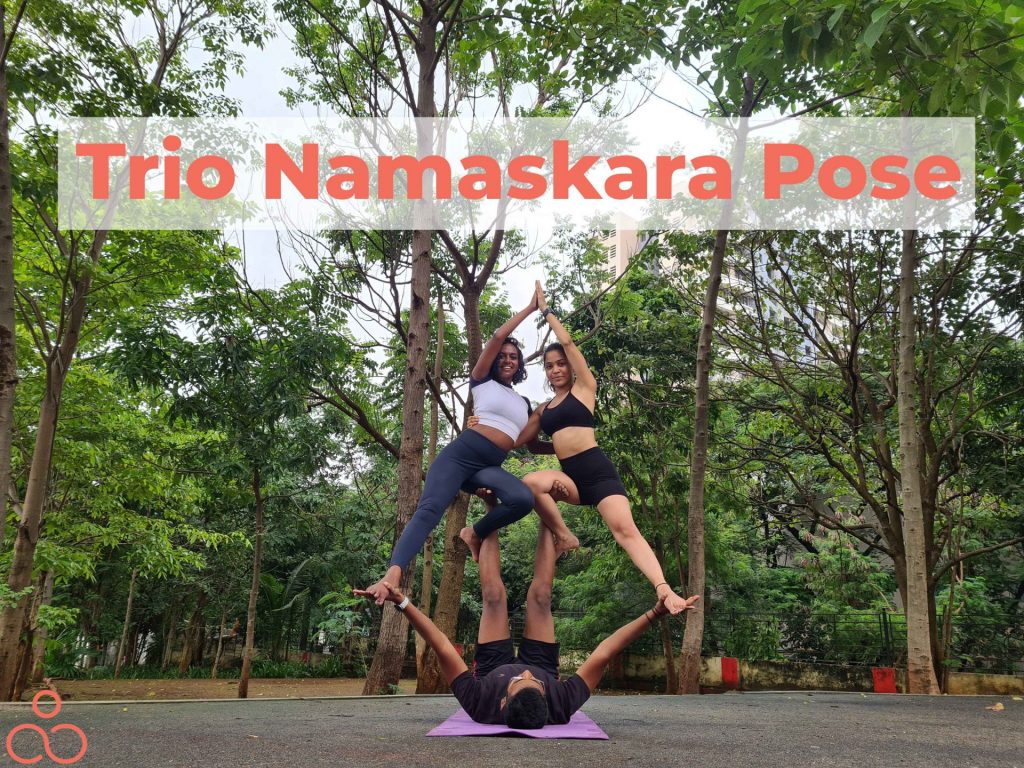
- To try this Trio Namaskar Pose , we need one base and two fliers. The base must have immense strength and stability while the fliers must be flexible and have a strong control over balance.
- To begin the pose, the base must lay down comfortably on the mat and bend his knees.
- Both fliers 1 and 2 must stand next to each other, closer to the hip and facing towards the face of the base.
- Both the fliers 1 and 2 must slightly bend their inner leg, take support of the base’s feet on their inner thighs and prepare for the ascend.
- As the base extends his legs and lifts the fliers off, both the fliers must wrap their legs on the base’s shin such that the ankles would be forward on the shin and toes on the calves of the base.
- After locking, both the fliers must gradually shift their body weight on the opposite or the outer side and balance that by positioning their heels on the palms of the base (the base must extend their hands sideways and lift them in the appropriate height to support the ).
- For better stability and counterbalance, the fliers must wrap their inner hands around each others backs and extend their outer hands up above to join in Namaste.
- To release from this pose, the base must lower their stance and let the fliers balance their weight on the ground using their outer legs and exit.
Benefits of Practicing this Pose:
- For Base, it will help to improve arms strength and legs strength
- For flier 1 & flier 2, it will help to improve leg strength, counter balance and overall strength as it requires continuous activeness of the entire body.
Mirror Tree Pose
Difficulty Level: Intermediate Pose
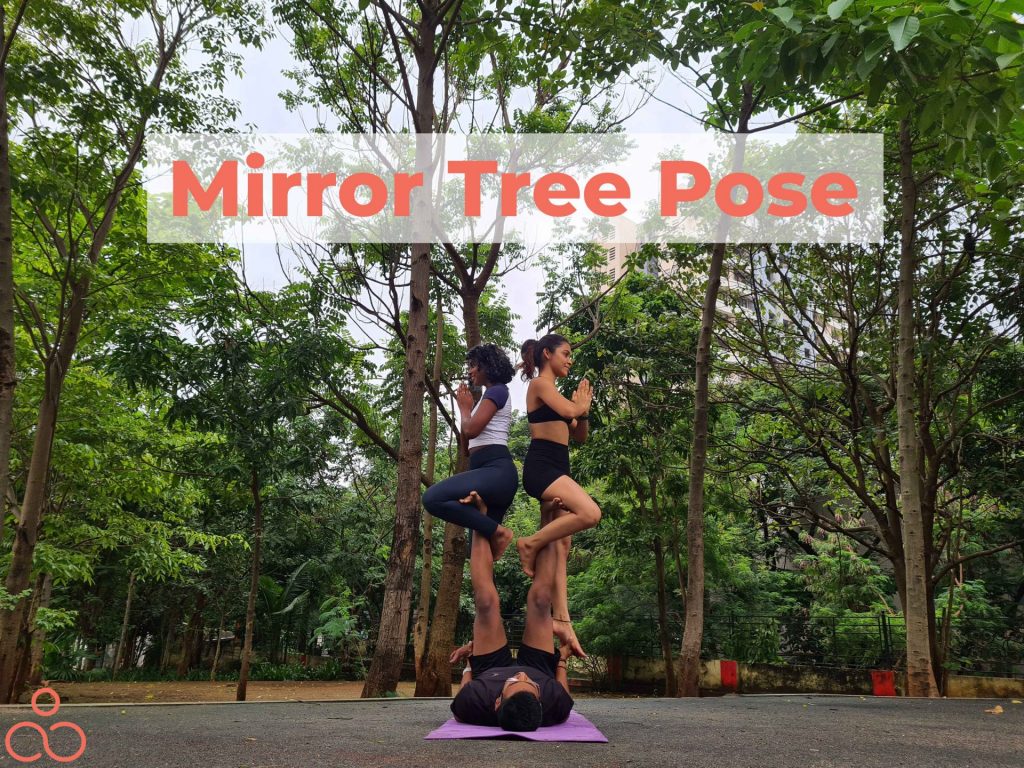
- To try the Trio Namaskara Pose, we need one base and two fliers. The hand, leg, and core strength of the base must be strong and the fliers must have a good body balance and stability. If the fliers are in a position to hold the tree pose comfortably on ground, then they can get in to this pose comfortably.
- To begin the pose, the base must lay down on the mat and slowly fold their legs tucking the knees towards the chest.
- Both the fliers must position themselves standing next to the base’s hip with their backs turned towards the base.
- Fliers must now shift slightly towards the base and prepare for the ascend with the support of base’s feet in near their inner thighs. For better support and balance, the fliers must wrap the respective legs, around base’s shin (ankles forward on shin and toe’s on base’s calf muscles.)
- Now, the base holds the foot of the inner leg of flier 1 and flier 2 on his sides with his palms and creates an overall push using both the hands and legs to confidently lift the fliers up. The fliers must also help shift the weights according to the slow, and keep themselves light and active while lifting.
- So, this tree on a single leg, where the base lifts the fliers on one leg wrapped in Tree pose and the other leg positioned on their hand, is quite challenging for the Base.
- To release from the pose, the base must slowly lower their stance and let the outer legs of the flier balance on the ground. The fliers will then move out of the pose by unwrapping themselves, and releasing the base as well.
Benefits of Practicing this Pose:
- For Base, it will help to improve arms strength and legs strength
- For flier 1 & flier 2, it will help to improve leg strength, counter balance and overall strength as it requires continuous activeness of the entire body.
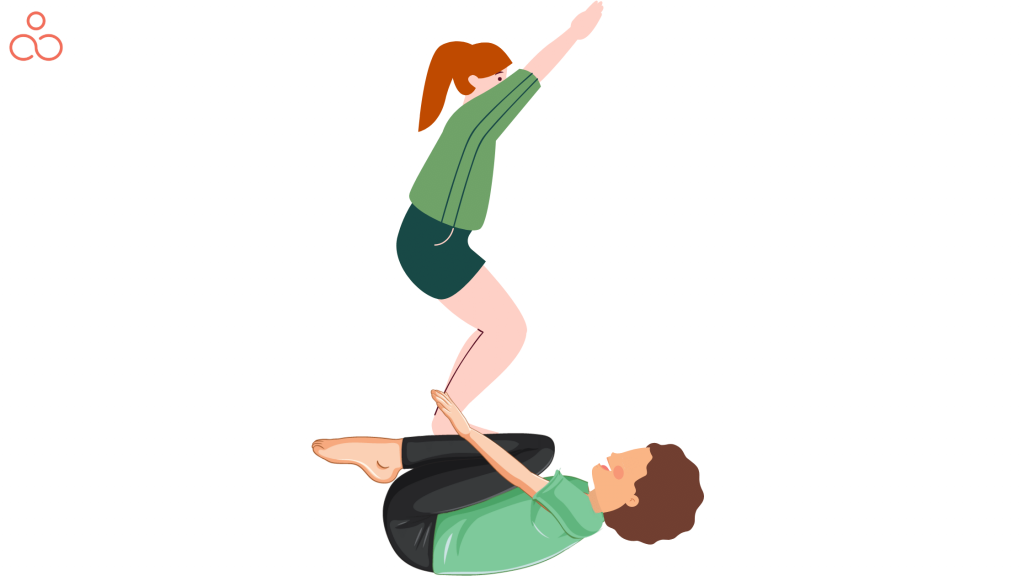
Trio Inclined Cat Pose
Difficulty Level: Intermediate Pose

- To try this complex-looking pose, we need one base and two fliers. For this pose, all three yogis must have immense core strength, flexibility, stability, and balance.
- To begin the pose, the base must lay down on the mat and fold their legs, tucking them towards the chest.
- Flier 1 must stand behind the hips of the base and looking forward towards the face of the base.
- The base must place the feet on flier 1’s shin and both the base and flier 1 will create a hand hold to create the balance for the ascend. The base slowly lifts the flier 1 up by straightening their legs.
- Flier 1 must parallelly shift their body weight majorly on to the base’s hands, bend their knees towards the chest, and move in to the Child’s pose releasing the base’s hands.
- Flier 2 must now do a plank right above the base’s torso, positioning their hands next to the base’s head. The flier 2 will prepare for the ascend by placing their knees on the palms of the base and the base lifts the flier 2 off the ground, as shown in the image above.
- To create the link and maintain the overall balance, flier 1 will hold the feet of flier 2 and straighten their upper body, moving in to the cat pose.
- To release the pose, flier 1 moves back into the child’s pose. The base must lower their stance by bending the knees and elbows, allowing the fliers to descend and touch the ground.
Benefits of Practicing this Pose:
- For Base, it will help to improve arms strength and legs strength
- For flier 1, it will help to improve Counter balance and sense of weight shifting
- For flier 2, it will help to improve arms strength, inversion skills and overall strength as it requires continuous activeness of the entire body.
Guarding Throne Pose
Difficulty Level: Intermediate Pose
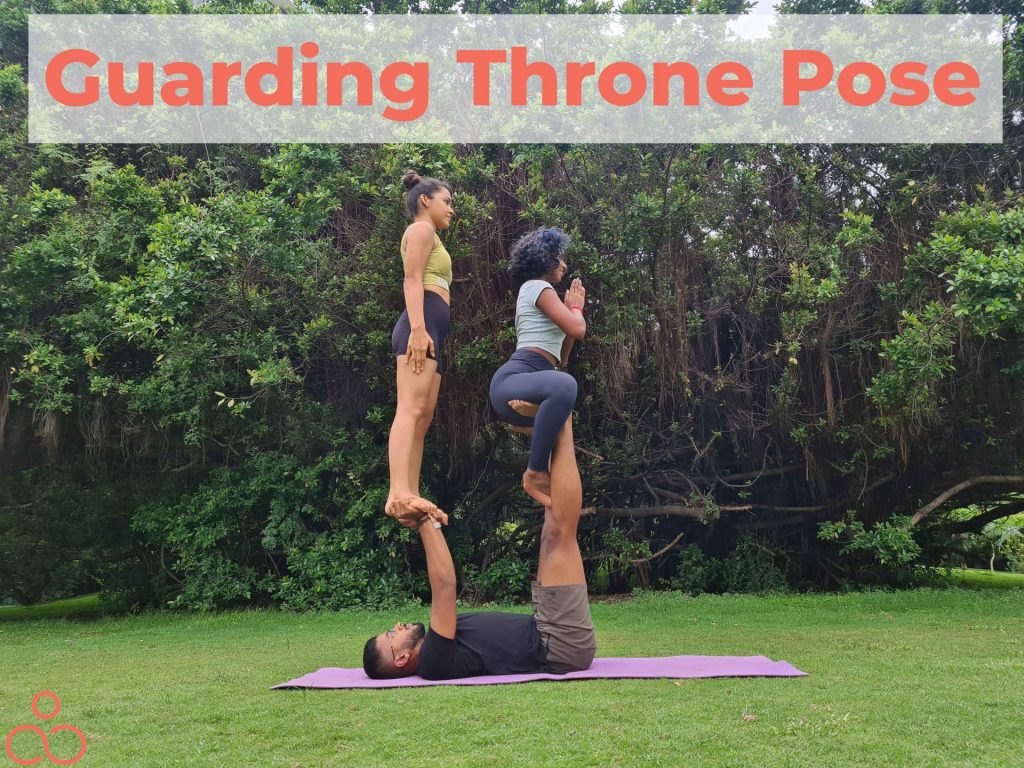
- To try this Guarding Throne Pose, we need one base and two fliers. As a preparatory exercise, all three yogis must be able to hold the Foot-to-Hand Pose and Reverse Throne Pose individually in pairs of two’s. Try this combination only after all of you master the preparatory poses.
- To begin the pose, the base must lay down on the mat and fold the knees towards their chest.
- Flier 1 must stand just behind the hips of the base and face in the opposite direction. They must squat down into the Goddess Pose, take support of the base’s feet on their hamstrings, and prepare for the ascend.
- The base must slowly straighten their legs and move flier 1 into the Reverse Throne Pose. Flier 1 must wrap their legs around the base’s shin and join their hands in Namaste.
- On the other hand, flier 2 must stand near the head of the base, facing toward flier 1. The base must bend their hands and elbows, keeping their elbows, triceps, and shoulder intact on the ground.
- Flier 2 must gently take support on the shoulders of flier 1, place their feet on the palms of the base, and prepare for the ascend.
- The base must now slowly lift the elbows off the ground and straighten their arms upwards. Flier 2 must find the balance, release support on flier 1’s shoulders, and join hands in Namaste.
- To release the pose, flier 2 must again move out first by taking a gentle support on flier 1’s shoulders and with the helps of the base. The flier 1 moves out next as the base lowers their leg stance.
Benefits of Practicing this Pose:
- For the base, it will help to improve arms strength and legs strength.
- For flier 1, it will help to improve balance, leg strength and understand the sense of weight shifting.
- For flier 2, it will help to improve balance and understand the sense of weight shifting.
Advanced three person Yoga poses
Only try these poses with people who are quite experienced in Yoga!
Backbend Loop Pose
Difficulty Level: Advance Pose
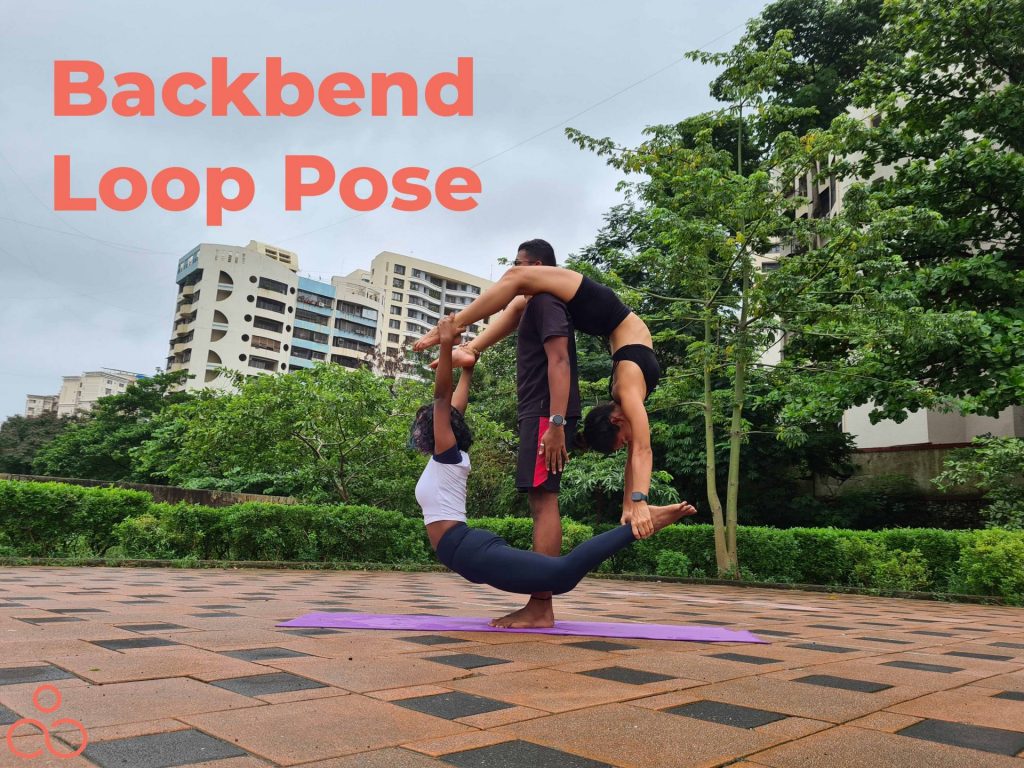
- To try this Backbend Loop Pose, we need one base and two fliers. To do this pose, make sure that both the flier’s back is warm and open enough that they can go into an intense back-bending pose with comfort.
- The strongest person must stand in the center and be the Base.
- The base must lift up one of the fliers on his shoulders, by making the flier seated on his/her shoulders facing forward.
- The second flier will stand in front of the base facing forward (opposite to the base) and holds the upper flier’s ankles.
- The lower flier will lift behind one leg at a time while the base will hold the flier’s both thighs.
- The upper flier will bend backward and hold the ankles of the lower flier’s ankles.
- Once both the fliers hold each other’s ankles, the base can release the thighs of the lower flier slowly.
- To get down from the pose the base will squat down a bit till the point where the lower flier’s legs don’t touch the floor.
- The upper flier will slowly release the ankles of the lower flier one at a time. After that, the lower flier will slowly release one hand at a time and place the hands down on the floor.
- The base will squat completely down to get the upper flier down.
Benefits of Practicing this Pose:
For the one who is standing, this pose will build the overall strength, whereas for both the individuals who are in the air, this pose will help them to enhance and open up their entire spine and increase arm strength.
L-Base Stacked Hand Bird
Difficulty Level: Advance Pose
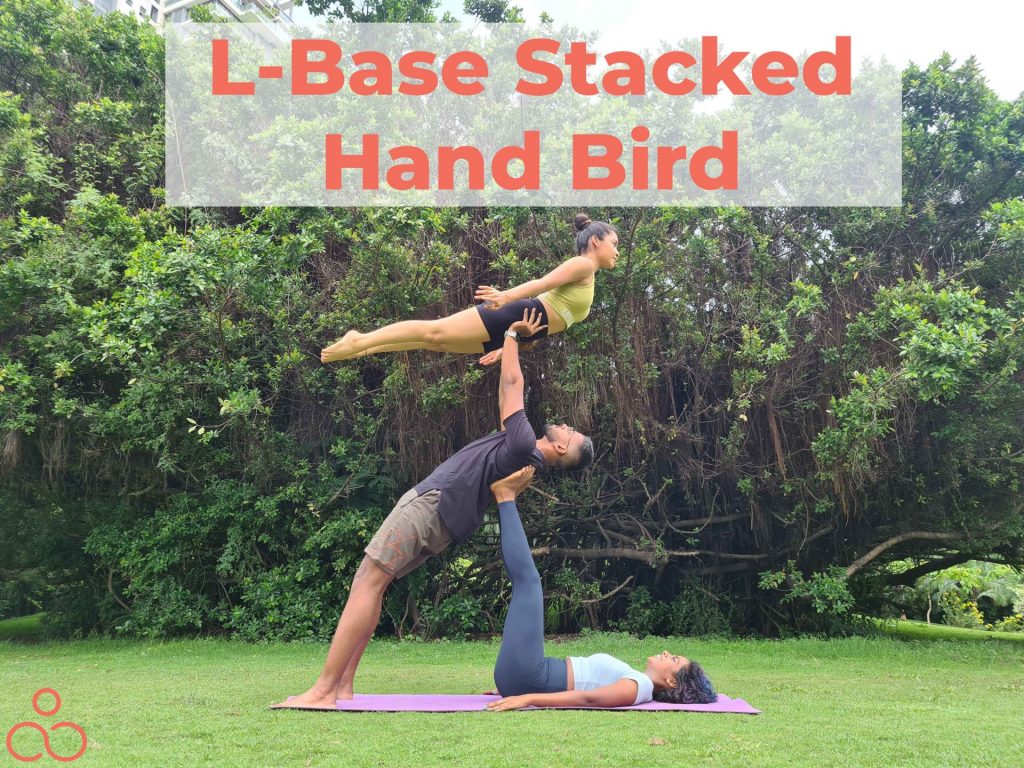
- To try this L-Based Stacked Hand Bird Pose, we need two bases and one flier. The strongest base will be standing in the middle facing opposite to the other base who is laying down on the floor. The flier will be standing in front of Base 2 (Base who is standing), facing towards him.
- Base 1 who is laying down must place their feet on base 2’s shoulder plates and base 2 must lean back completely.
- The flier must now climb up on base 2’s thighs while keeping the hands upon base 2’s shoulders.
- Base 2 must place the hands upon the flier’s waist and slowly lift the flier with all the strength trying to straighten the elbow such that base 2’s wrist, elbows, and shoulders are in line with base 1’s ankle, knees, and hips.
- After being lifted up the flier must lift the upper body, straighten the legs, and position the hand nest to the thighs of the flier. along with the legs. The legs will be straight and hands next to the thighs for the flier.
- To release from the pose, the flier must climb down by dropping their legs on the base’s thighs and hands upon the base’s shoulders. Later, base 2 can stand up straight and tall.
Benefits of Practicing this Pose:
- For Base, it will help to improve arms strength.
- For flier 1, it will help to improve leg strength.
- For flier 2, it will help to improve sense of counter balance, core strength and overall strength as it requires continuous activeness of the entire body.
Twin Hammock Pose
Difficulty Level: Advance Pose
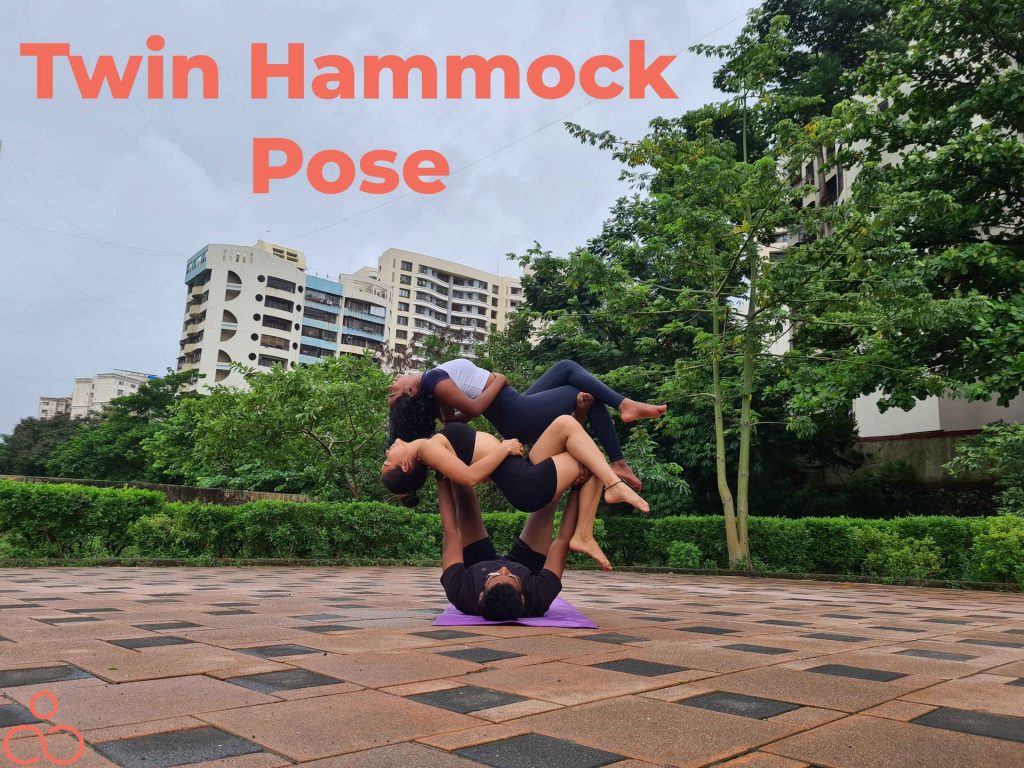
- To try the Twin Hammock Pose, we need one base and two fliers. The base must have immense strength and control over the body to balance both the fliers on their hands and legs. The base must know how to do the Double Throne Pose and Double Bird Pose, to try this pose comfortably.
- This pose is a resting Pose, where most of the work is done by the base, but that doesn’t mean fliers have no work at all. Fliers continuously have to balance and stabilize their posture keeping the body still and at rest.
- To begin the pose, base must lay down on the mat with their legs folded and knees tucked towards the chest.
- Flier 1 must stand next to the base’s hips on the right side and flier 2 must stand next to the base’s right shoulder. Both the fliers should be facing the base’s right side.
- Both the fliers must squat down in chair Pose/Utkatasana and hold.
- First flier 1 must lean behind towards the base while the base places their right foot under flier 1’s knee joint. The flier 1 must then lean a little more back and lay down as the base places his/her left foot on the upper back, under the neck.
- The base must now slowly straighten both knees to lift flier 1 off the floor. To get into a comfortable posture flier 1 must move into the hammock pose hanging the ankles, hip, and head down towards the floor with their chest and knee lifted towards the sky.
- Flier 2 must repeat the same but on the base’s hands, where the base will place their right hand under the flier’s knee joint and the left hand under the flier’s upper back.
- To release this pose, the base must bend their right elbow to get flier 2 down first and then bend the right knee to get flier 1 down.
Benefits of Practicing this Pose:
- For Base, it will help to improve arms strength and leg strength
- For flier 1 & flier 2, it will help to improve sense of counter balance and will open up the back resulting in a relaxing pose.
Foot to Foot on Bird Pose
Difficulty Level: Advance Pose
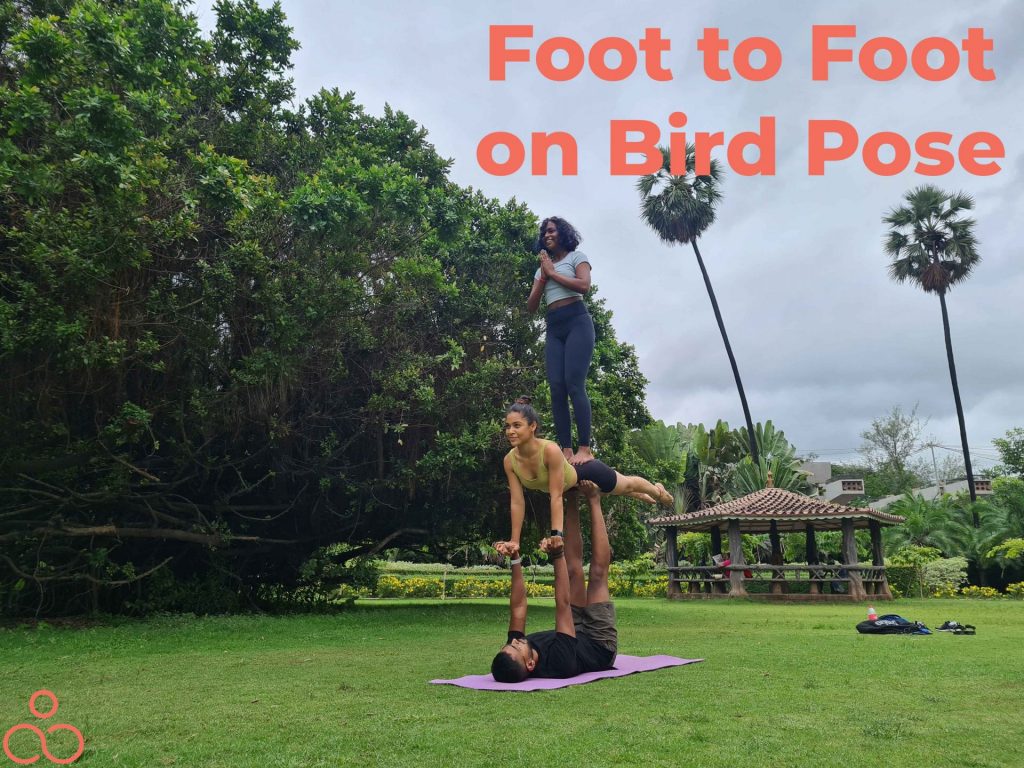
- To try this pose, we need one base and two fliers. The Base must have a strong core strength and balance to be able to lift two fliers in the air with stability and comfort. As a preparatory exercise, the yogis can work on some basic dual poses like Double bird or throne before trying this.
- To begin the formation, the base must lay down on the mat and fold their legs with knees tucked towards the chest.
- Flier 1 must climb up on Flier 2’s back wrapping the legs around the waist and arms around the neck as in a piggyback ride.
- The base must place both feet on flier 2’s waist and lift her in bird pose along with flier 1 on the back.
- Once Base and flier 2 adjust comfortably in the Bird pose, flier 1 must lift their upper body up from flier 2’s back and sit on flier 2’s hips in crossed leg position.
- Stay in this pose till you get comfortable and find the right balance. Flier 1 must slowly try to stand up on Flier 2’s hips and balance over there. Both the flier 1 and the base’s feet must be in one line in this pose.
- To release from this pose, flier 1 must slowly sit down on flier 2’s hips, lean forward on flier 2’s back, and wrap arms around the shoulders of flier 2. The base must bend the knee and slowly get flier 2 down along with the flier 1 n their back.
- Once flier 2 is down on the ground, flier 1 can release the hand hold at the shoulders and get down.
Benefits of Practicing this Pose:
- For Base, it will help to improve arms strength.
- For flier 1, it will help to improve leg strength and balance.
- For flier 2, it will help to improve sense of counter balance, core strength and overall strength as it requires continuous activeness of the entire body.
Mirror Padmasana Pose
Difficulty Level: Advance Pose
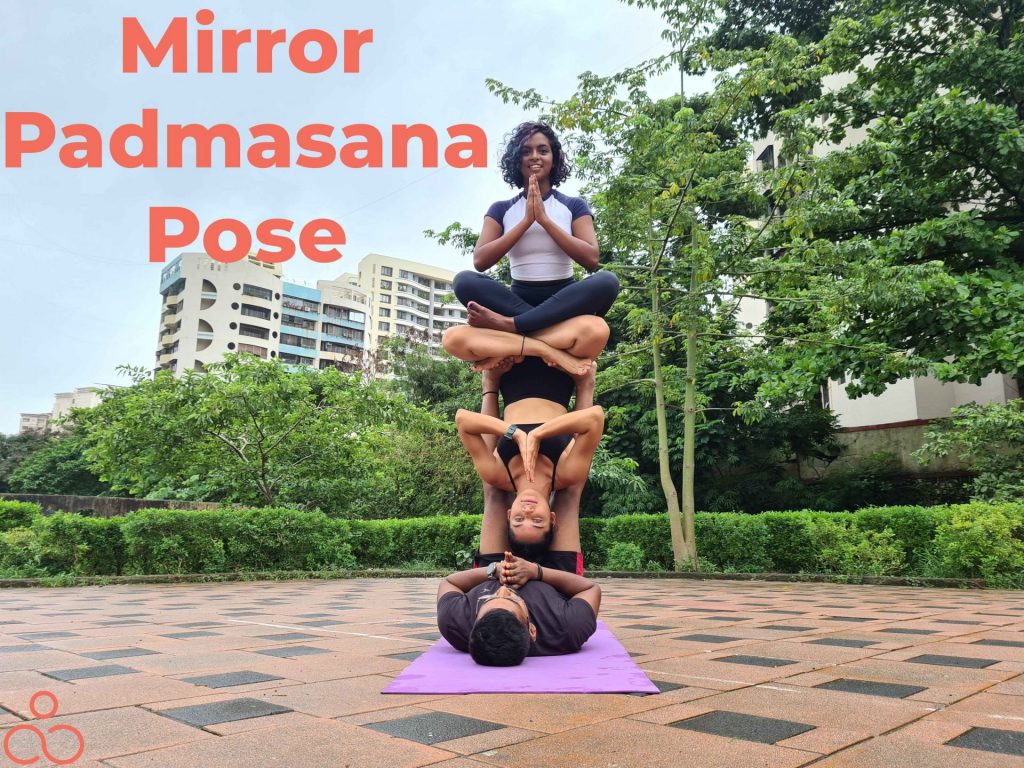
- To try this Mirror Padmasana Pose, we need one base and two fliers. The base must have immense core strength and must be able to do a leg press with a weight equivalent to both fliers.
- The base must be able to master the Bat Pose individually with the fliers and the fliers must be able to sit comfortably in either Padmasana or Sukhasana, before actually moving on with this combination pose.
- To begin the pose, the base must lay down on the mat and fold their legs with the knees tucked towards the chest.
- Flier 1 must stand facing in the opposite direction, just next to the hip line of the base, on any side, (let’s assume the right side in this case). With the support of the base’s foot on their waistline and a hand hold with the base’s hand (the right hand of the flier with the left hand of the base), flier 1 must perform a half-cartwheel over the base.
- With adequate support from the base, flier 1 must move into the Bat Pose with their head down and both legs in a straddle position balancing on the base’s feet.
- Slowly, flier 2 must fold their legs either in Padmasana or Sukhasana. The base must now lower their stance and provide support for flier 2 to take ascend.
- Flier 2 must comfortably climb on top of flier 1 and sit there with the legs folded either in Padmasana or Sukhasana. The base must gradually lift both of them as if they are doing a leg press and try to hold this Mirror Padmasana Pose.
- To release from this pose, the base must lower their stance by bending their knees and allowing flier2 and flier 1 to get down in the respective order.
Benefits of Practicing this Pose:
- For Base, it will help to improve leg strength.
- For flier 1 & flier 2, it will help to open up the hip joint and improve sense of weight shifting.
Twin Eagle Pose
Difficulty Level: Advance Pose
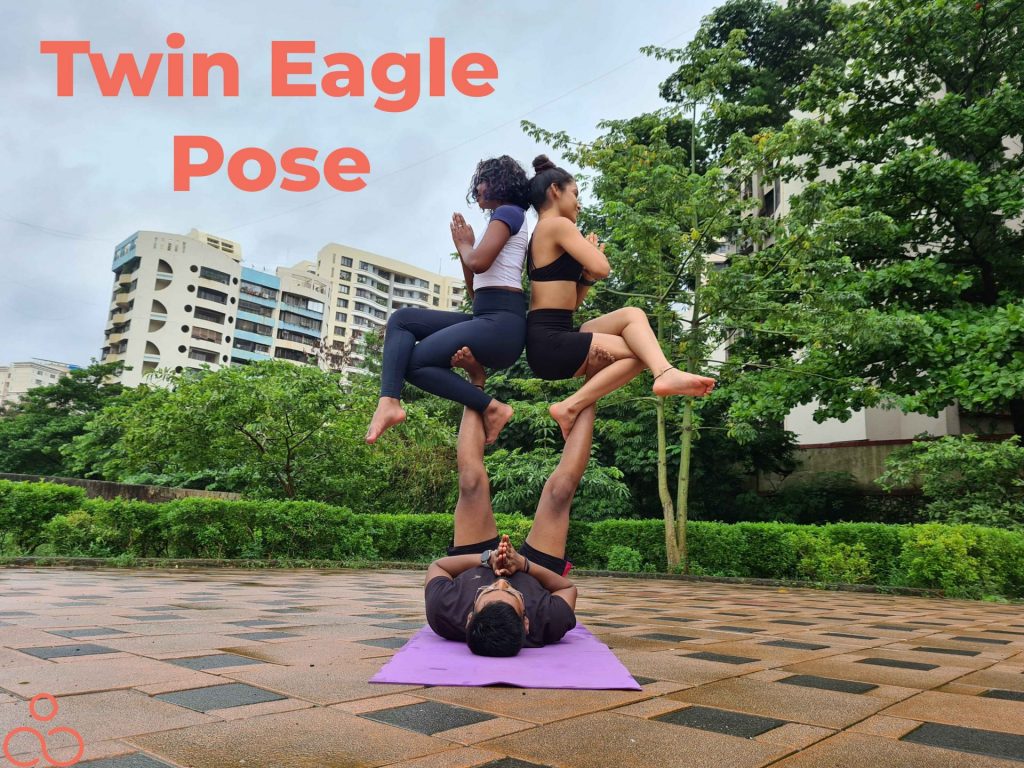
- To try this Twin Eagle Pose, we need one base and two fliers. This pose is nothing but the Eagle Pose on a single leg, where Base must be able to lift individual fliers on only one leg. The fliers must be able to do Eagle Pose on the floor for at least 1 minute and have good control over their body.
- This Pose is a variation of the Mirror Tree Pose with increased difficulty for the flier, which means the trio should master the Mirror Tree Pose before attempting the Twin Eagle Pose.
- To begin building the pose, Base will lay down with legs bent and tucked towards the chest. Both flier 1 and flier 2 must stand on the right and left side of the base’s hips, facing opposite to each other on the side respectively.
- Both the fliers must place their lower thigh (hamstrings) of the inner leg on the Base’s feet and then wrap their legs on base’s shin (ankles forward on the shin and toes on base’s calf).
- Once the legs are wrapped, both the fliers must shift their weight onto the base’s foot. The base must hold both the flier’s heels of the outer leg, use the right strength to straighten the knees, and lift both the fliers up together so that the counter balance is maintained.
- The fliers must now get their other leg’s hamstring on top of the thigh of the leg which is wrapped forming the Eagle pose. This could be slightly challenging as it will require the fliers to lift their legs and get into Eagle pose without any support from any of the sides.
- To release from this pose, both the fliers must remove the upper leg and get it down in the air, pointing towards the base so that he/she can hold the heels and provide support.
- The base must lower their stance and provide the right support for the fliers to reach the ground. Once they stabilize, the fliers must unwrap their feet from the base’s shin and release from the pose completely.
Benefits of Practicing this Pose:
- For Base, it will help to improve legs strength
- For flier 1 & flier 2, it will help to improve leg strength, counter balance and overall strength as it requires continuous activeness of the entire body.
Combinational Tre-Eagle Pose
Difficulty Level: Advance Pose
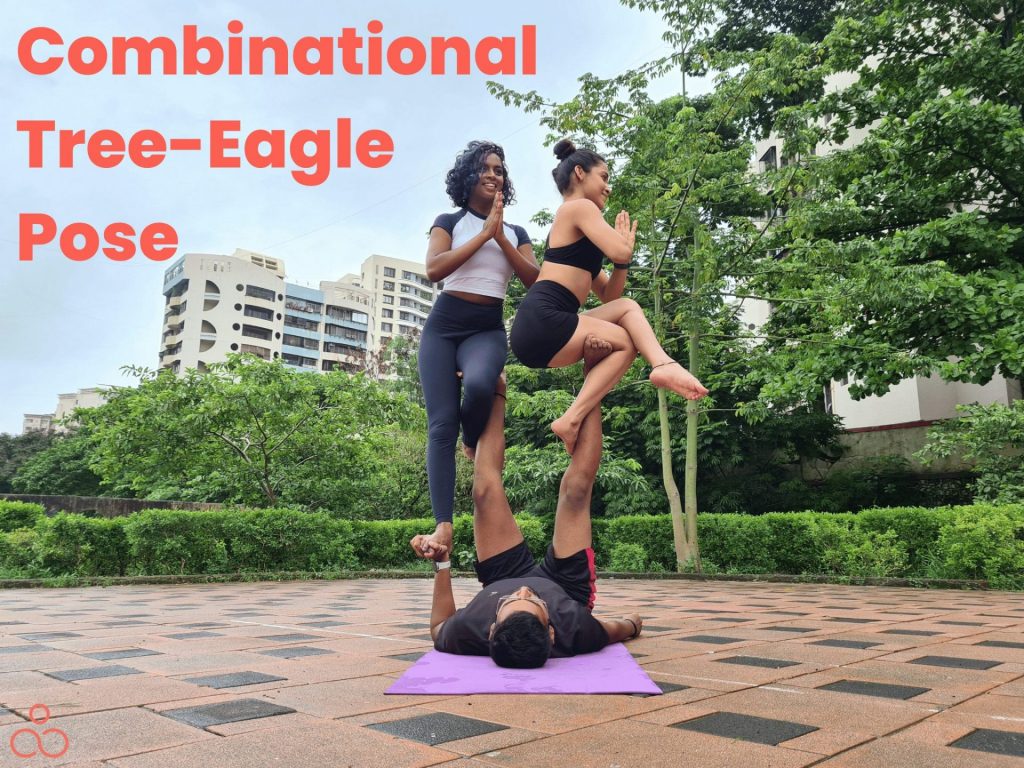
- To try this Combinational Tree-Eagle Pose, we need one base and two fliers. As the name says, this is a combination of the Eagle Pose on one leg and the tree pose on the other leg. Before attempting this pose, the trio should gain expertise in Twin Eagle Pose and Mirror Tree Pose.
- The base should be able to lift individual fliers on only one leg to be able to perform this Pose. The fliers should be able to do Eagle Pose and Tree Pose on the floor for at least 1 minute and have good control over their body.
- To begin the pose, the base must lay down on the mat and fold their legs with knees tucked in towards the chest.
- Both flier 1 and flier 2 must stand on the Left and Right sides of the base next to the base’s hips.
- Flier 2 must face the right side of the base looking opposite to the base’s hips and flier 1 must face towards the front in the direction of the Base’s head.
- Both the fliers must place their lower thigh (hamstrings) of the inner leg on the Base’s feet and then wrap their legs on the base’s shin (ankles forward on the shin and toes on the base’s calf). Once the legs are wrapped, both the fliers must shift their weight on the base’s foot.
- The base must support both the flier’s heels of the outer leg, use appropriate strength to straighten the knees, and lift both the fliers together so that the counterbalance is maintained.
- The flier 1 must look front and join the hands in Tree Pose.
- Flier 2 must get the other leg’s hamstring on top of the thigh of the leg which is wrapped and move into the Eagle pose.
- To release from this pose, flier 2 must remove the upper leg and hang it down towards the base. The base must try to support flier 2 by holding the heel of the hanging leg.
- The base must lower their stance and bring the fliers down. Once the fliers find their balance on the ground, they can unwrap their legs and release the pose completely.
Benefits of Practicing this Pose:
- For Base, it will help to improve arms strength and legs strength
- For flier 1 & flier 2, it will help to improve leg strength, counter balance and overall strength as it requires continuous activeness of the entire body.
Trio Straddle Star Pose
Difficulty Level: Advance Pose
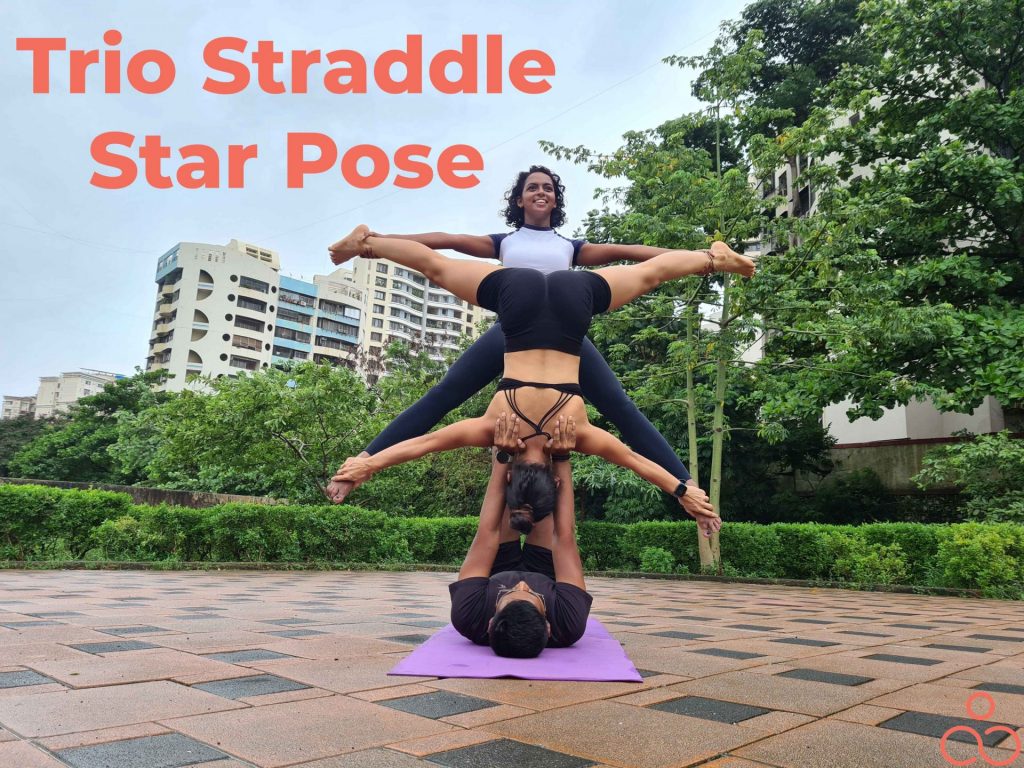
- To try this Trio-straddle Star Pose, we need one base and two fliers. The base must have immense strength to hold the fliers in free-hand style in any of the following poses – Throne Pose, Shoulder-Stand, Candle-Stand, or Needle Pose, individually.
- To begin the pose, the base must lay down with legs folded and tucked towards the chest.
- The Base must lift flier 1 in Bird Pose. Then, flier 1 should hold the base’s elbows, get the upper body down, and legs up in straddle moving into the Shoulder Stand Pose.
- Now, the base will get the legs down on the floor and flier 2 must walk forward and above the base’s hips facing towards flier 1.
- Flier 2 must get into Sumo Squat Position and the base should place both their feet under flier 2’s hips. The base must use the right strength to straighten the knees and lift Flier 1 in the Free Hand Throne Pose while balancing Flier 1 in Shoulder Stand Pose.
- Flier 1 must hold flier 2’s ankles and vice versa. The Base must engage full strength to balance both fliers up.
- To release from this pose, both the fliers must release each other’s ankles and then the base must lower the stance to get flier 2 down from the Throne Pose. After that flier 1 will bring both legs down next to Base’s hips slowly and get down.
Benefits of Practicing this Pose:
- For Base, it will help to improve arms strength and legs strength.
- For flier 1, it will help to improve balance and sense of weight shifting.
- For flier 2, it will help to improve inversion skills, core strength and balance.
Twin Mermaid Pose
Difficulty Level: Advance Pose
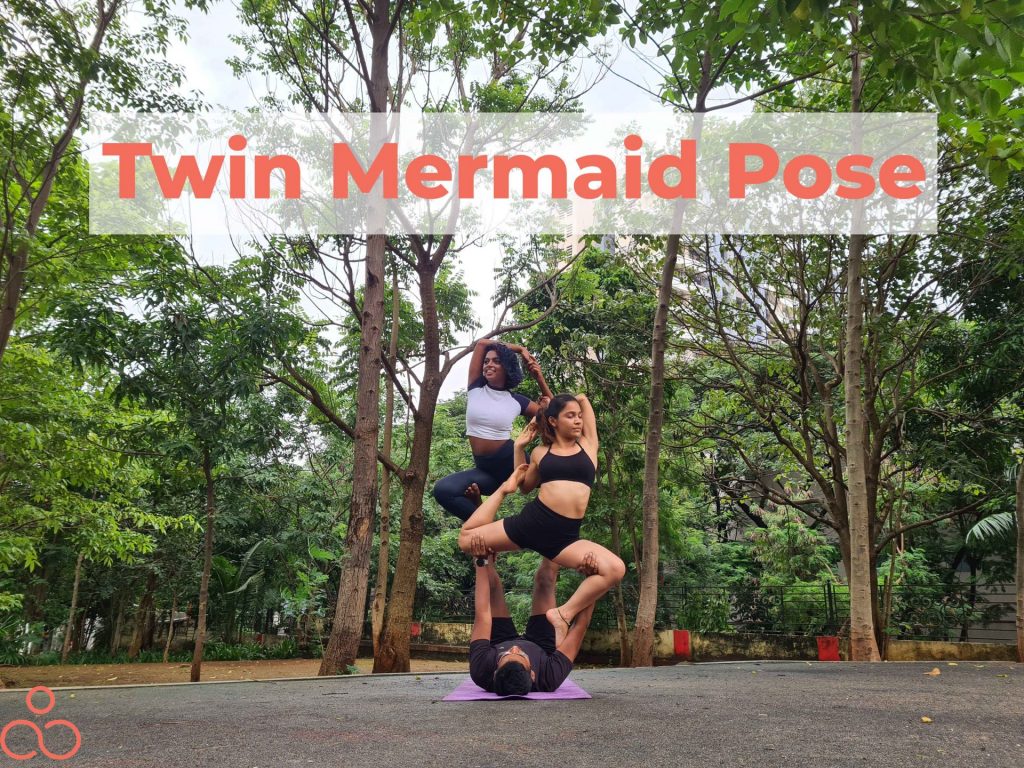
- To try this Twin Mermaid Pose, we need one base and two fliers. Both the fliers must be flexible enough to hold Mermaid Pose and Acro Throne Pose comfortably and with ease. The Base must be able to lift both the fliers u together in any trio Acro Pose. For this the Trio can Practice the Double Throne Pose.
- To begin the pose, the base must lay down on the mat with their legs folded and tucked towards the chest.
- Flier 1 must stand right behind the base’s hips and open their legs wide into Goddess Pose. The base must bend the knees and place the feet under flier 1’s thighs.
- The base must use their complete leg strength and lift the flier. Flier 1 must balance in the Goddess Pose while going up and then lock both ankles on Base’s calves.
- Flier 2 must stand right above the base’s chest by keeping both the legs on both the sides. Flier 2 must bend the knees and come into goddess pose.
- The base must place the hands under the flier’s thighs and then lift flier 2. The flier 2 must balance in the Goddess Pose while going up and then lock both ankles on Base’s Triceps.
- Once both the fliers are in Throne Pose, they must unwrap any one but opposite legs to each other, (example: flier 1- left leg & flier 2 – right Leg) and bend that leg, toe pointing upwards, and get into Mermaid Pose. The Trio should stay calm and balanced in this Pose.
- To release this pose, both the fliers must calmly release their upper leg and slowly get it down in the Throne pose.
- Now, flier 2 must release the ankle lock and the base should bend the elbows slightly so that flier 2 can get down on the floor.
- After flier 2, flier 1 must release the ankle lock and the base should bend the knees slightly so that flier 2 can get down on the floor.
Benefits of Practicing this Pose:
- For Base, it will help to improve arms strength and legs strength
- For flier 1 & flier 2, it will help to improve back, quadriceps and hamstrings flexibility and will improve overall strength as it requires continuous activeness of the entire body.
Trio Podium Pose
Difficulty Level: Advance Pose
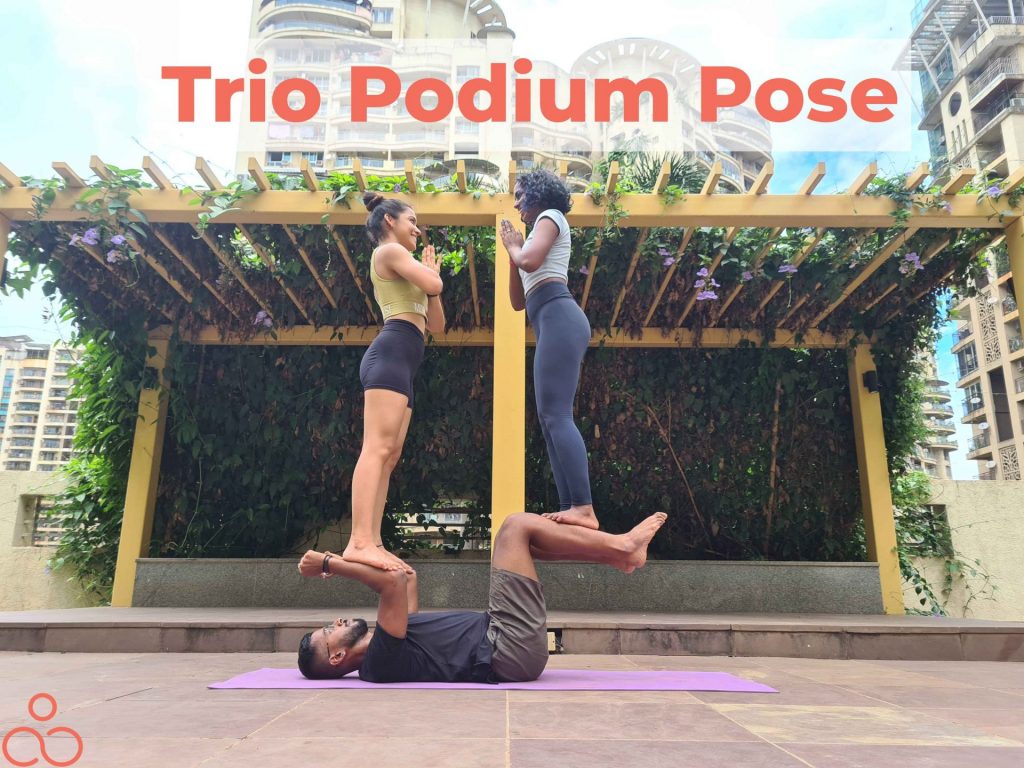
- To try this Trio Podium Pose, we need one base and two fliers. The base must have immense strength, balance, and stability. Weighted static workouts or challenges can help!
- Before attempting this Trio Pose, you need to practice single poses individually in Pairs of Twos. To do that follow steps 3 and 4 of this explanation separately and once you feel confident enough, combine both of them as explained in the instructions.
- To begin the pose, the base must lay down on the mat with their legs folded and tucked towards their chest.
- Flier 1 must stand in front of the base’s hips facing forward toward Base’s Head. Flier 1 must hold Base’s hands and slowly climb up on Base’s shin bone.
- Base and flier should slowly release the hands and flier 1 must stand straight on the shin.
- Now the Base must use their strength to get the hip and knee at a 90-degree angle as shown in the image. As the Base is lifting the legs flier 1 must try to maintain the pose by balancing there.
- Now, flier 2 must stand in front of the base’s head facing towards flier 1. Then, the base must lift the hands straight towards the sky and bend the elbows so that the fingers point to the flier 2’s knee.
- After that flier 1 must hold flier 2’s hands and slowly place the feet on the base’s forearm and stand straight. Both the fliers must then release each other’s hands and join their hands in Namaste.
- The base must use their strength to maintain this pose, while both fliers balance there with no sudden movement.
- To release this pose, both the fliers must hold each other’s hands while the base still holds the pose intact. Flier 2 must get down first from the hands followed by flier 1.
Benefits of Practicing this Pose:
- For Base, it will help to improve arms strength and legs strength
- For flier 1 & flier 2, it will help to improve balance and understand the sense of weight shifting
Tri-Face Box Pose
Difficulty Level: Advance Pose
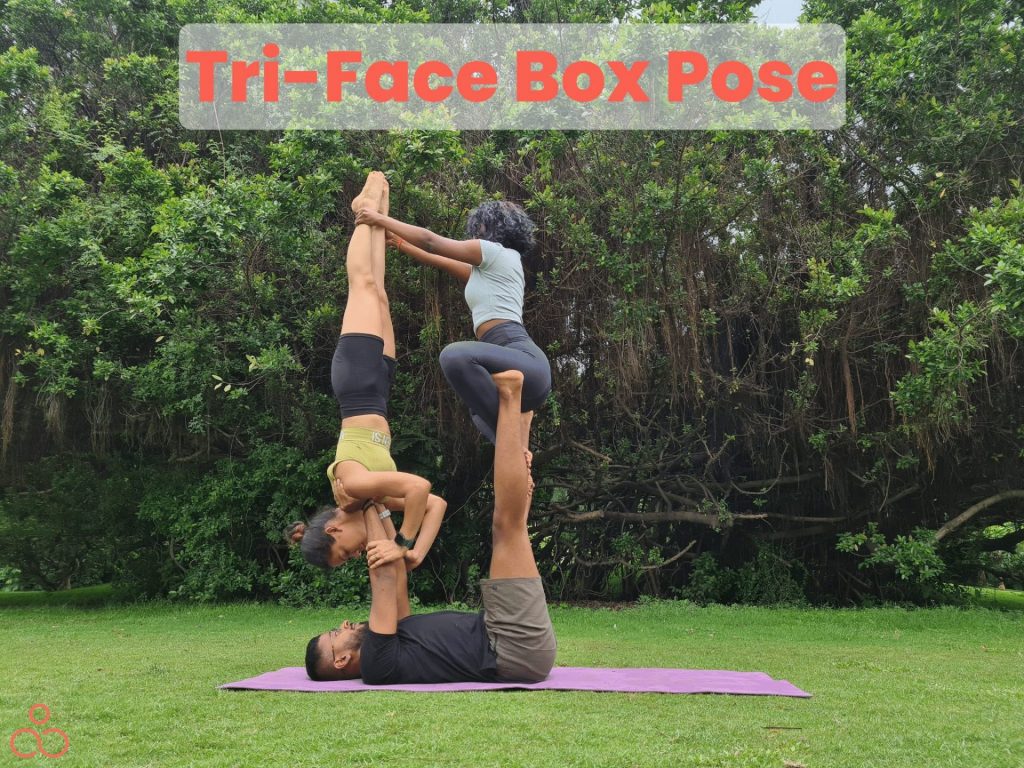
- To try this pose, we need one base and two fliers. Both the base and fliers need to have good control over their body and immense strength to actively lift themselves up. This Pose may look complicated but once you get the technique it will be easier.
- Before attempting this Trio Pose, you need to practice single poses individually in Pairs of Twos. To do that follow steps 3 and 4 of this explanation separately and once you feel confident enough, combine both of them as explained in the instructions.
- To being the pose, the base must lay down on the mat with legs lifted up.
- Flier 2 must stand behind base’s hips facing forward towards base’s head. Base must place the feet on flier 2’s shin and both of them should hold hands.
- Flier 2 must shift the weight on base’s hands and base must then try to lift flier 2 up by straightening the legs.
- Flier 2 must bend the knees towards the chest and get into the Child’s Pose releasing Base’s hands. After that flier 2 must slowly lift the upper body, nice and tall, keeping just the knees bent.
- Now, flier 1 must stand in front of the base’s head facing towards flier 2. Then, the base must lift the hands straight toward the sky but the elbows, triceps, and shoulders must remain on the floor close to the upper body.
- Flier 1 must hold flier 2’s waist and carefully climb up on the base’s Palms. The base must slowly lift the elbows off the floor and straighten the arms completely.
- Both the fliers must keep their hands on each other’s shoulders for extra support, completing the box shape.
- To release from this pose, flier 2 must bend the knees and come down into Child’s Pose. The base must slowly bend the elbows and flier 1 should carefully get down.
- Once flier 1 is on the floor and out of the mat, the base must hold flier 2’s hands. Now Base must bend the knees while flier 2 straightens their knees towards the floor and get down properly.
Benefits of Practicing this Pose:
- For Base, it will help to improve arms strength and legs strength
- For flier 1, it will help to improve balance and understand the sense of weight shifting
- For flier 2, it will help to improve balance, leg strength and understand the sense of weight shifting
Throne & Needle Pose
Difficulty Level: Advance Pose
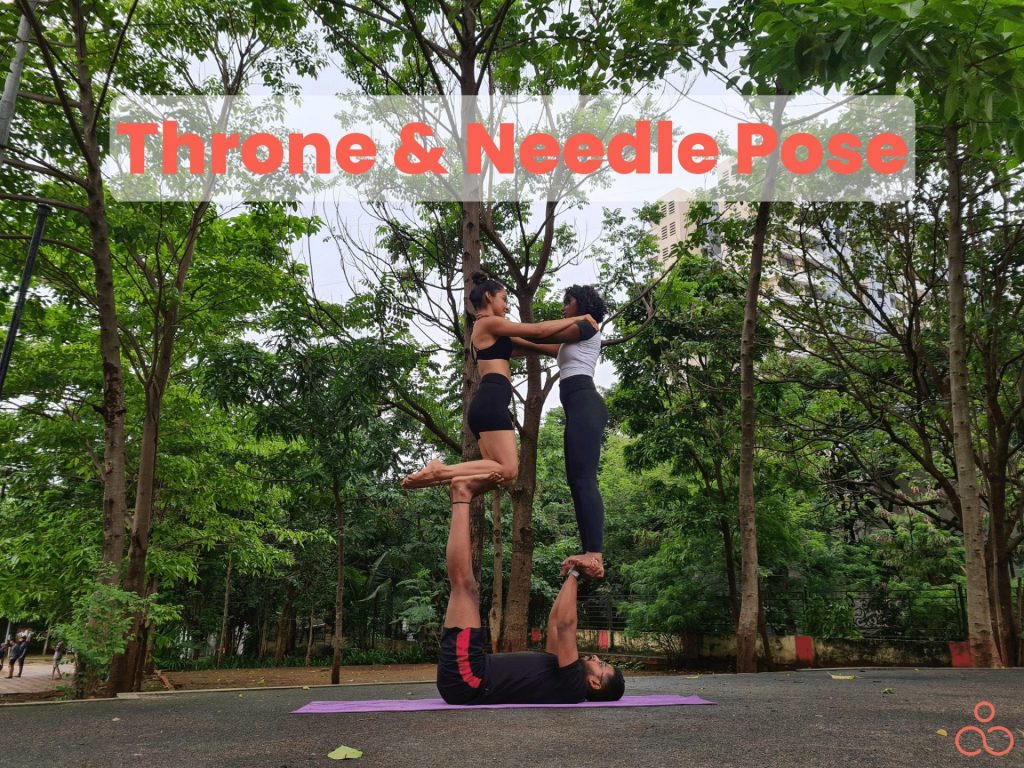
- To try this Throne and Needle Pose, we need one base and two fliers. For this Pose, both the fliers must have good practice of the Throne Pose, Free Hand Shoulder Stand Pose, and Acro Needle Pose. The Base should have enough strength to lift both the fliers, for which the trio can practice Double Throne Pose.
- To begin with the pose, the base must lay down with their legs folded and tucked towards the chest. The base must lift flier 1 in Bird Pose.
- Now, flier 1 must hold the base’s elbows, get the upper body down, and legs up towards the sky getting into the Shoulder Stand Pose.
- Once flier 1 is in Shoulder stand Pose, the base must get the legs down on the floor. Flier 2 must walk forward and above the base’s hips facing towards flier 1.
- Flier 2 must get into Sumo Squat Position and the base should position the feet under Flier 1’s thighs. The base must engage complete strength to straighten the knees and lift flier 2.
- Flier 2 must wrap the legs on the base’s shin in Free Hand Throne Pose. Once You reach here, flier 2 must hold flier 1’s ankles and the Base should continue to balance both fliers.
- To release from this pose, first flier 2 must release flier 1’s ankles and then Base should bend the knees and get flier 1 down from Throne Pose. After that flier 1 should bring both legs down next to the base’s hips slowly and get down.
Benefits of Practicing this Pose:
- For Base, it will help to improve arms strength and legs strength.
- For flier 1, it will help to improve balance, legs strength and sense of weight shifting.
- For flier 2, it will help to improve inversion skills, core strength and balance.
10 Tips To Follow While Doing Acroyoga
- Start off with a workshop to test the waters, and then you can go ahead with more frequent sessions.
- At Acro, you need to make sure that you have the basics down before you move on to the more complex poses.
- Everyone is a complete rookie, so no prior Acro or Yoga experience is needed!
- Acroyoga is open to all – no matter your age, size, or weight. However, it’s not recommended if you have vertigo, high blood pressure, herniated discs, a destabilized sacrum, or have recently gone through surgery.
- You can partner up with pretty much anyone as long as you are comfortable with them.
- When practicing Acroyoga, having the right technique is just as essential as having strength. Mastering the right moves not only makes the moves more impressive but also helps you to stay safe while performing them.
- Focusing on proper alignment will give you more power than using your muscles alone. This way, you can even lift someone heavier than you.
- You don’t even need to be super flexible.
- All you need is to be mindful of your body, learn the basics, and take your capabilities to the next level.
- Start with smaller people, then move on to people your size, and if you’re feeling adventurous, you can challenge yourself by lifting heavier partners.
- Don’t push your body beyond its limits; instead, take it slow and progress gradually.
Precautions to Follow While Doing Acroyoga
When it comes to Acro Yoga for beginners, it is essential to consider various safety points to avoid any unfortunate accidents.
- When it comes to safety, your environment should be your first priority. Ask yourselves if the area you’re training in is suitable and secure – Is it hazard-free? Does the surrounding have any risks or anything that could put you at risk? Make sure you’re aware of your surroundings and take any necessary precautions to stay safe and secure.
- When attempting Acroyoga, it’s important to ensure that you and your partner have enough space to take a tumble if needed. Make sure the area is free from obstructions that could cause an injury.
- You must recognize that our capability to perform a particular skill can depend on how we feel emotionally, mentally, and physically. Moreover, it’s essential to be aware of external aspects that can affect your performance, such as your environment, the people around you, and the condition of your partner. Take a careful review of how you handled the situation. It’s OK to take it slow when beginning with Acroyoga postures.
- Connecting and communicating are essential parts of being human. Your communication style – whether it’s with yourselves or others – is a critical factor when it comes to feeling safe, having enjoyable experiences, and making progress. Being kind, gentle, and relaxed when communicating can help you bridge gaps, both with those around you and with yourselves.
- Before attempting any skill, it’s important to make sure that everyone involved is comfortable with it. A good rule of thumb to remember is to always ask your partner if they are open to it first. If they say no, respect their wishes, and don’t push it; a forced or coerced yes is still a no. On the flip side, an enthusiastic yes is a sign that they are ready to proceed! When everyone is in agreement, you can get to having fun and making amazing Acroyoga art together.
Communication Is The Key!
With a creative, informal, and informative tone, this activity is sure to be a unique and unforgettable experience. Let’s see how
- Acroyoga requires a high level of trust and communication between two or more people as you work together to complete poses and flows.
- It’s also a great way to learn how to rely on others and hone your physical and mental agility.
- Besides pushing you out of your comfort zone, Acroyoga also has many physical benefits.
- Everyone involved in a group has a crucial role in the trick, so you must communicate your comprehension of the trick to ensure everyone has a better understanding of it.
- It’s a good idea to switch roles occasionally to get a better idea of what each role involves.
- If you’re looking for an activity that helps you learn to depend on others, work on your physical and mental agility, and push yourself out of your comfort zone, Acroyoga is the activity for you!
FAQs
Is Acroyoga difficult to do?
If you are a beginner to yoga itself then it could be slightly challenging. However for yoga practitioners who would have attained a core strength and body flexibility through their individual yoga practice then you are about to get started with a more interesting form of yoga.
Who can do Acroyoga?
Acroyoga has no age or gender restrictions as long as you are fit, flexible, and carry the strength to move along with the pace of your partner. Finding the right balance and staying focussed on the moves is all that is necessary for you to unlock the enjoyment of flying in a yogic way.
Can I do Acroyoga all alone without a partner?
Yes, you can do Acroyoga all by yourself too! But this could sound very similar to aerial yoga! Please look for a trainer who can introduce you to the Acroyoga solo strength practices and steps to begin your journey.
Can I give Acroyoga a try?
Sure thing! Just make sure you’ve got a good level of physical fitness, and that you don’t have any major health issues. You should also be comfortable with physical contact – after all, Acro Yoga does involve some partner work. If that’s not for you, it might be a good idea to sit this one out.
What should I wear while doing Acroyoga?
When it comes to Acroyoga, comfort is key! Opt for clothing that allows flexibility and won’t expose too much skin when you’re in various poses. Avoid wearing any jewelry that could get tangled, cut your skin, or get caught in your base’s hands and feet. Lastly, it’s best to go easy on the perfume—the last thing you want is a fragrance to interfere with your practice!
What to eat before doing Acroyoga?
When it comes to Acroyoga, you want to be in the best shape possible. Heavy meals and greasy snacks will weigh you down, so it’s best to avoid them in the hour leading up to your session. Alcohol and drugs will just make everything worse, so make sure you’re sober before you start your practice. Instead, opt for something light and healthy like an apple or banana, about half an hour before you get going. You’ll be burning plenty of calories during your practice, so keep snacks and water nearby to make sure you stay energized and hydrated throughout.
Does your body have to be super-bendy to Acroyoga?
Not at all! You don’t have to be a professional contortionist to start practicing this awesome form of yoga. Your body can adjust with regular practice – so don’t worry if you feel a little stiff, to begin with. You’ll be a pro in no time!
Why should I do Acroyoga?
Acroyoga is the perfect choice for you! It’s a collaborative activity done with a partner or a group. It can help supplement any Hatha or individual practices you may already be doing. Acroyoga isn’t just about developing strength and flexibility – it also builds trust and a sense of community. You will learn to be in control while also letting go of it, as you explore your strengths and limitations. Plus, you can hone in on your verbal and non-verbal communication skills – learning how to ask for what you want, respect your body, and listen to both your own body and others. Acroyoga is a fun and creative way to cultivate strength and flexibility, as well as develop communication, cooperation, physical touch, and the art of giving and receiving. If you want to truly deepen your yoga practice, give Acroyoga a try!
What is the relation between Acroyoga and traditional yoga?
There’s a special bond between Acroyoga and yoga that makes them work together so well. Let’s take a closer look:
- Acroyoga is an amalgamation of yoga and acrobatics, providing an opportunity to move with mindfulness and body awareness while simultaneously strengthening your physical prowess.
- It is a perfect combination of grace and energy, allowing you to explore the realm of movement with creativity and detail.
What is the difference between Acroyoga and traditional yoga?
Understanding what makes Acroyoga so different from traditional yoga can be a challenge. Hence we have highlighted the most common differences between them to make it easier for you:
- Acroyoga emphasizes the journey, the process of the practice, and the connection between the base and the flier. This is in contrast to traditional yoga, which places more emphasis on the result, the aesthetics, and the technique of the trick, focusing more on athleticism and performance.
- Acroyoga requires at least two people to practice and pairs well with Hatha or other individual forms of yoga. Unlike traditional yoga, the focus is not only on personal body and ability but on the connection between people. This style of yoga is an inventive and informal way of gaining insight into yourself and your partner.
How to avoid the possible risks of Acroyoga?
- Start your journey with simple poses that you can find safe and comfortable. You can try with two-person poses where both the partners are safe on the ground and develop trust on each other before flying off. Check out our Valentine’s day yoga poses, they could be a great start!
- Always prefer hiring a yoga teacher or attend a yoga studio to experience the Acroyoga technique while you are in safe hands. Professional guidance is recommended to be safe. Don’t be absent-minded while performing these poses. Be mindful that your partners are trusting you fully. In order to be successful, all three of you need to be in synchronized harmony.
- As you progress to advanced moves and take off the ground, remember to stay focussed and concentrate. This applies to both the parties involved in order to feel safe and achieve the poses with right balance.
- Last but not the least, continue to practice your solo yoga poses as well to improve your strength, balance, and flexibility. This allows you to explore 3 person yoga poses easily and experiment multiple variations both indoors as well outdoors under the skies. And don’t forget to snap the moments of falls, laughter, and perfection. One last tip before you go, come up with fun and quirky names for your Acroyoga poses with your friends. We know lots and lots of laughter-falls will follow through.
Can I still do Acroyoga if I’m a bit overweight?
Acroyoga is ideal for all sorts of people, regardless of their body type or size. Even if you’re carrying a few extra pounds, there’s no reason why you can’t make the most of this wonderful practice. So don’t be scared, come and join the class and you’ll soon discover the amazing benefits of Acro!
Conclusion
You now have all the information you need to begin your Acroyoga journey! Whether you’re looking for an activity to do in pairs or trios or a workout that targets both your mind and body, Acroyoga is an exceptional choice. Not to mention, as long as you keep safety precautions in mind, Acroyoga is both fun and risk-free. So don’t wait any longer – go ahead and start your Acroyoga journey today!
